Showing posts with label tree. Show all posts

Monday, September 25, 2023

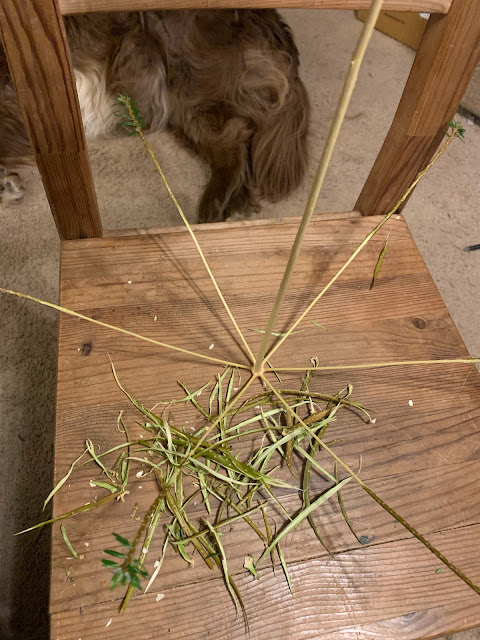
Tvare (Fir Whisk)

    Have you been following the findings in Lendbreen as the glacier is melting?  You can read up on it on the "Secrets of the Ice" website A little bittersweet, but archaeologists have been discovering all kinds of artifacts that are incredibly well preserved because they've stayed frozen for so long.  Most have to do with caribou hunting camps, but one find has really jumped out at me.  The archaeologist have determined that it was the remains of a Tvare, a Scandinavian whisk!  And the process is so elegantly simple!  The Saxon Forager also has a great video about these Here.


STEP ONE: Find a nice evergreen tree whose branches come out in an even whorl.  If you're going to be using it for food, make sure it's not a yew or other toxic wood.  A fun option is to use the top of your Christmas tree when you're done with it or need to trim the top!

STEP TWO: Cut the length you want your utensil to be below the whorl.


STEP THREE: Remove the needles and save for tea.  Trim center trunk/handle as desired.  You really have two options here.  Choose the side of the whorl that will make the right diameter handle for you: not too spindly and not too thick.


STEP FOUR: strip all bark.  I started to do this with a knife, but found it came off easier just peeling it by hand.  It was a little sticky, but smelled AMAZING!  I also whittled down the end I wanted to be flatter under the whorl of branches.


STEP FIVE: Drawing up the tines to the handle and pushing out a little bit to get them to the right angles, I held and wrapped with wire and allowed to dry completely for a week or two.  


I made a second Tvare out of the next whorl down on the tree, using the section of trunk above the branches for the handle as an especially large whisk with short, unbound tines for my big cauldron.  


It worked great!  I can't wait to make more of these in the future!  Maybe even make it a New Years tradition to make one from the top of our Christmas tree.


Thursday, October 1, 2015

Beyond the Books: September

Can you believe it’s October!  The time seems to be slipping by, yet I adore this time of year!  Especially this year!  After being away from a place where “harvest time” has such meaning, I can’t get enough of all the autumn-ness going on right now!  From the colors, to the leaves crunching, harvest produce, cheery pumpkins, crisp air, and holiday anticipation!  Ah, I love it! 

Last month I shared some ways we took our home preschool outside or even just found different ways to learn.  I thought I might keep up the pattern every month to possibly give others some ideas.  And maybe you’d share more of yours with us?  I always appreciate new inspiration!  I am not one to plan things out well, but sometimes just seeing someone else's ideas can spark an idea that would work for the particular circumstance. 

Eclipse: Fynn has been asking about fractions (halves and quarters) a lot lately and I realized it’s a little difficult to explain because it changes depending on what it’s a fraction of.  I knew math was going to be hard for me, but I thought I’d have a couple years of smooth sailing!  Nope.  I think I'm starting to impart the idea of what a half is at least, and being able to go outside and watch the super blood moon eclipse was a fun way to teach about what half of a moon would look like!    While we waited for the moon to rise, we saw the beautiful sunset over the lake and looked up to watch the stars come out.  We even saw one shooting star and a couple planes and satellites.  Wow, why don’t we do this more often!?  Josh pointed out the Big Dipper and it made me think about how I’d like to learn the constillations some day.

Now that is something that’s wild: the sky.  Sometimes I feel like it’s hard to find a truly wild place anymore down here in the lower 48.  Even in Alaska, for that matter, it’s not easy to get to the wild country.  But the sky, it’s always right there, and every clear night your eyes can wander galaxies away.  How does that song go?...”I don’t care, I’m still free, you can’t take the sky from me…”

Geek moment over.  Before we went out that night, I showed the kids a couple YouTube videos (SciShowKids was by far my favorite)  explaining what was going on so they could kind of have an idea when we got out there.  And I guess some little ones can be frightened by the odd moon, so we wanted to avoid that scenario if at all possible through education.

Trees: we ended up exploring trees a lot this month as we watched their leaves go from many shades of green to the vibrant oranges, yellows, reds and purples.  Also fascinating has been discussing the variety of ways that trees will naturally try to plant new trees:  seeds!  We discected several evergreen cones and found the “treasures” (seeds) inside. 
 

And I’m not certain what these (pictured below) are called that fall from the maple trees, but we’ve been calling them helicopters or whirly-gigs.  I’m pretty sure God made them that way as a toy for forest-wandering children as well as a seed transport mechanism because my kids could toss these into the air and watch them whirl forever!  They are rather hypnotizing.
 
 
  A big horse chestnut tree behind our house also started dropping it’d mace-like bulbs, then spilling the shiny brown nut.  It was like treasure hunting here every time we went out, too!  Now I have a whole bucket full I’m not sure what to do with!  Any ideas?  We took a closer look at the areas where the branches had been cut last month and we discovered sap: the smell, texture, color, and even the taste!  Then the little ones started using it as an adhesive!  They glued twigs and leaves to just about anything, even a letter they sent to Grandma. 
 

We still have a lot to learn, but I feel like we made some great progress!  And of course there is just the joy of jumping in a big pile.  PE?  Oh and leaf rubbings for art class?  We did also discuss why the leaves that had fallen were a different color and becoming dry and brittle (disconnection from the sap stream). 

 
Animal Wisdom:  Something that I feel is very important for anyone to learn is how to interact appropriately with animals and we are getting so many more opportunities here!  Having pets in the house is an awesome start and really helps them to be unafraid of animals (and decreases the likelihood of allergies!)  But I'm always so excited when they can meet new critters!  Our sweet friend from whom we buy eggs always lets us go visit the chickens, feed them a snack and check for eggs!  It's such a treat when they're not your own!  She also has some rabbits they love to pet, too!  So soft!  We talk about walking slowly and quietly and gentleness with all the animals and especially the eggs! 

We also got to visit ducks and were later confronted by a gaggle of geese at a new park we visited this week!  With the ducks we got to talk about not chasing them and what were good snacks to offer them.  Did you know that bread crumbs are not good for them?  I didn't until this past year.  You can learn more about that from Stella123 here.  Then the geese came at us as we were walking in another part.  Our little animal lover was so excited and started to run at them with open arms to hug them all!  We learned how to be cautious with geese and remember that they are wild animals and can hiss, bite, and scratch.


Fractions: We discovered this a little with the moon, then we got some pears from the farm stand across the street and got half and even quarter concepts a little more engrained.  MMmmmm!  What a yummy way to learn math!

Writing: I’m struggling a little with ideas for this one.  We have done a little book work, then tracing with the chalk.  It also seems to help him if there is a purpose to his writing.  Copying letters over and over in a book is tedious, but when he wants to  write a letter to his friends or relatives he  seems to be much more motivated. 

Library story time:  Sometimes, you hear too much of Mom’s voice and just hearing  another seems so much more enjoyable.  A couple age-appropriate stories, songs, and activities they were able to engage in along with others their own age.

Museums: At the beginning of the month we went to a science museum.  It was a bit overwhelming and we didn’t get to see everything.  But I so remember going to science museums growing up, and even though I hated reading through the signs, the concepts I saw demonstrated there quickly came back to me when I had to read about them later on. 


Then there was the Smithsonian museum day and we got into the local historical museum free last weekend!  The little ones are just beginning to understand that there has been quite a bit of  time before right now.  Lots of questions about how life went on without engines or electricity.  Great questions and ones I want them to think through!  I want them to figure out alternative ways to do things, how to do without, and know what is important. 
Dorris Ranch also had a fun pioneer day at their recreated village.  The kids were taught about the Wagon Trains, frontier life, trapper life and native life.  They got to practice hoeing up the hard dirt by hand, washing clothes with a wash board, hauling water, grinding flour, writing with a quill and some native children's toys. 


Music: A very thoughtful and generous couple from our church decided to lend us their keyboard for as long as we wanted it! Wow!  And there are all kinds of drum beats and instrument sounds built in.  The kids are loving playing around with it!  No formal lessons yet, but what a fun introduction!  And we found the ukulele, too, so now the rest of my crew can all play their “ ‘tar’s” together! 

 Then Monday night we all went to see one of the artists we know at a concert held behind an ice cream shop in town.  It was really a lovely venue with a giant mimosa tree growing in the middle.  The kids loved the harp, piano and guitar and danced along to the upbeat songs.  A late night, but well worth it!

Our little guy nailed it this week when he told me he goes to lots of schools.  I asked him what he meant by that and he said, "Well I have homeschool and Sunday school and Daddy school and Grandpa electric school and outside school and..."  The list went on, but that's all I remember and I just thought, Yes!  He gets it!  Learning is everywhere! 

Grandpa Electric  (and construction) school:  I've heard several other homeschool moms talk about this and I love the idea.  If there's someone else in your life who's knowledgeable about something (especially if it's something you do not excel in!) consider asking them to teach your little one a skill.  Most people (especially Grandpa!) are more than happy to share their knowledge!


Sunday School crew discovering bugs and making their own salad from things they picked from the garden:
 
Projects around the house: paper making, baking together (apple oat muffins!), drawing a picture together, building a barn for their toy animals with Daddy, corn husk doll making, and map reading with Daddy and Grandma. 


I enjoy writing these out because it helps me remember that they are learning and getting new experiences all the time.  I think like any mom I often worry that I don't do enough.  And maybe I don't, but they're learning anyway!  If you'd like anymore information on any of these projects, please let me know!  I'd love to hear what you are interested in! 


Monday, September 21, 2015

Autumn Scavenger and I-Spy Jar


It’s AUTUMN!!!  I’m just so excited!  This is the first time in seven years that we’ve had a fall season that lasts more than a week or two!  (It’s super short in Fairbanks where the snow is already falling right now)  The colors and pleasant crispness and all the harvest activities are so appealing to me!
 
Behind our home are two trees side by side: an apple (see my previous blog post about these treasures!) and a horse chestnut.  The later took us a while to identify this summer, but now it’s perfectly obvious as it drops it’s fruit to the ground.  And it’s shedding its leaves quickly!  Dumping might be a more appropriate term.  


So our big guy started raking the leaves all together this week into a big pile.  He did pretty well before getting distracted and I was able to finish it up into a 3-4 foot pile.  I had to explain to them what to do, then ready…set…GO!  They sped to the pile and jumped right in!  Oh, they were thrilled!  Squealing and giggling, throwing the leaves in the air and burrowing down in.  By far the best part of their day!
 
Clancey getting in on the joy
 
Sometimes you just need to get outside and get some fresh air!  We were having one of those days earlier this week, and everyone was grumpy.  In fact, our oldest was seriously fussing that he did NOT want to go out!  I insisted because I knew it was just the medicine we needed, though I didn’t even know what we’d do once we got there.  We just started wandering and picking up tiny treasures, and as we went the mood improvement was drastic!  There were feathers, acorn hats, pebbles, lichen, pinecones, and bark.  Each new item was celebrated.  We got back to the house with a bagful and I wondered what we could do with our collection?

I had a freshly washed honey jar and we tucked them all away in there.  It was so fun to look at them all through the glass and remember finding each one!  We’ve hung on to it now as an I-spy jar.  They will try to pick out the items they found or I’ll ask them to find something white, round, sharp or whatever.  It’s really been quite fun and such a simple form of entertainment!  You could do this with anything!  I even thought about picking up litter along the road for some tidying and color variety.  Or maybe toys that get left out!  Even if you just kept it to natural items, it would look different depending on the season.


Then just yesterday I read about this Nature Pal Exchange and it looks so fun!  From what I understand, every season you can sign up to have a sort of pen pal in another climate.  Then you go on a nature walk and collect little treasures just like we did earlier.  You take them home, label them, and send them off to your nature pal while they do the same.  Then you get to discover nature treasures from a completely different region!  How fun!  And I love how they keep the focus on God's creation and how we can be responsible with it.  This is their first year and they're already supporting charities with the monies made, too!  I’m going to see if we can get in on this next one and I’ll let you know how it goes.  If you get a chance, check out their Instagram account, too.  Some of the collections are absolutely lovely!
 
Happy treasure hunting!

Friday, August 21, 2015

Lemonade Stand! And My Lessons in Branch Lashing...


The last bittersweet days of summer…

…are still incredibly hot!  It was pushing 100 degrees as we sat at our lemonade stand.  Which, I suppose, is good weather to have a lemonade stand in… either way, it was a much more preferable event than my trial and errors of making the stand itself!  So I wanted to share my experience with you with the hope that you might have an easier go of it. 


It all started when I read to our little guy about a lemonade stand in one of his books. We talked about it a bit and he (okay, we) got really excited about the idea!  We talked about how it would work and flavorings we would make, and when he asked, I told him I would see if we could make it work. 

First, I asked our landlord if it was even okay, then set to planning.  I’m not going to lie; my first plan failed miserably.  It wouldn’t even stand up.  So I’d like to tell you what not to do and then what worked for us. 

So, if you read my post about our fort (here) you’ll recall we have a ton of fresh, strong branches from a recent tree trimming and I thought they might make a cute, rustic sort of lemonade stand, too.  Josh insisted that lashing the round logs was the best way to secure them, but he showed me the right way to do that this time.  I’ll pass along that bit of knowledge in a bit, but first I’ll explain my failed design:  four upright posts, two braces on each side and a couple angled supports.  In the end, I had to back track and take several pieces off to make it a sort of A-frame.  Another gem Josh taught through this experience is that triangles are sturdier than squares/rectangles.  MUCH sturdier, though it still sits at a bit of an angle on our uneven ground.  But, it worked fine and I still like how it looks. 

So here’s the bit about lashing that I found very helpful and hope to use again in the future: I started laying the branches (each about 6 feet long with a 3 inch diameter) out the front on our patio (propping them up on paint cans made for some extra elbow room) and lashing the cross beams to the uprights.  So, we started with a clove hitch.  The best way I can describe that is to wrap your twine around one branch twice so they cross with a long tail.  Where the twine crosses, slip the tail under both sides and pull tight.    Easy peasy.

For the long beams across the front, we did square lashings, meaning I would go up and over the branch on top, down under the branch on bottom, then over the top on again on the other side.  Basically going around instead of cross.  Hopefully the photo can explain what I can’t with words.  I followed this pattern about five times over.

To add strength, I was advised to keep the twine as neat and snug as possible.  I’m afraid I didn’t achieve either to the degree I would have liked, but each one was better than its predecessor.  When the five times over-under-over-under pattern is complete, it can be tightened even more by doing the opposite: over the bottom, under the top.   About five times around again. This takes up much less twine each round because you’re only circling around the first batch to tighten them in together.  Again, I’ll have to refer you to the photo.

Once you’ve tightened the lashing, complete with another clove hitch and there you have it!  I did a slightly different pattern for the shorter braces going front to back.  The only difference is that after the starting clove hitch, I did a cross over back and forth so that they will support the board, still finishing with the tightening portion and ending in another clove hitch. Then lash the tops together in the same way and you’re done with the frame! 

I did add some kitty-corner braces in the front upper corners to give even more stability.  We laid a board across the top and decorated a little with table cloth, pendants, and sign (instructions to come for this one!  SO easy and fun!) 

This was by far the hardest part of the adventure.  Especially since we had to backtrack a bit there, but now that I’ve made that mistake you can save yourself the headache of it!  In the end, the materials I used were:

·         6’ long branches x 5

·         2’ long branches x 4 (2 for the front to back beams that held the counter, 2 for the corner supports)

·         12” board (ours was only an inch thick and 4’ long, but this could vary for you so long as it fits between your frame braces)

·         Lots of twine!  I used about half a skein.

·         A little scrap fabric if you choose to decorate

Total cost: $12 –but this was only because we had to buy that silly board and twine new.  Do you have something already laying around your house that would work?  Maybe you could make it for even less!  I was looking at lemonade stands online and all I found were well over $100.  Very well constructed all and would probably last forever, but I didn’t feel like we needed that. 


And, what I think the best part about this project was, the kiddos were able to help and learn along with me.  They helped pick the straightest, strongest branches, haul them to the patio, set up, and pick up all the stray strings and branches.  We had so many people comment on how much they liked the uniqueness and style of our stand as they came to visit and many random visitors took photos!  Of course, it was probably just for these two cuties sitting behind the counter! =)

I hope this helps you create your own stand at some point, even if you’re on a budget (be it time or money) and can save you a headache or two!  Coming up on Tuesday: an amazingly simple lemonade recipe that tastes amazingly good!  I’ll even throw in a couple flavoring syrup recipes, too! Stay tuned!
 
In need of more inspiration for simple lemonade booths?  Check out an adorable pallet one here, or this sweet one made of painted cardboard!