Historic Paints on Metal
June 15, 2024
Muirenn inghean Uí Cléirigh (Katie Kelm)
As far back as ancient Greece (900-31BC), soldiers began to carry elaborately painted shields. As time went on and helmets obscured identities in the middle ages, some armor-wearers with the resources to do so started to paint their helmets as well as their shields with their personal devices. This practice spread to the rest of their armor and continued into the Renaissance. But how did the paints that were perfected for manuscripts and frescoes work on the plate metal?

The purpose of this study is to compare and contrast paints that would have been available in the middle ages as they function on metal. In reviewing the results, those who wear armor might make informed decisions as to the method they choose to use in making their period paint. Nine different paint types were used for this experiment: water, full egg, egg yolk, glare, linseed oil, hide glue, egg tempura, gouache, as well as a modern acrylic paint to compare.
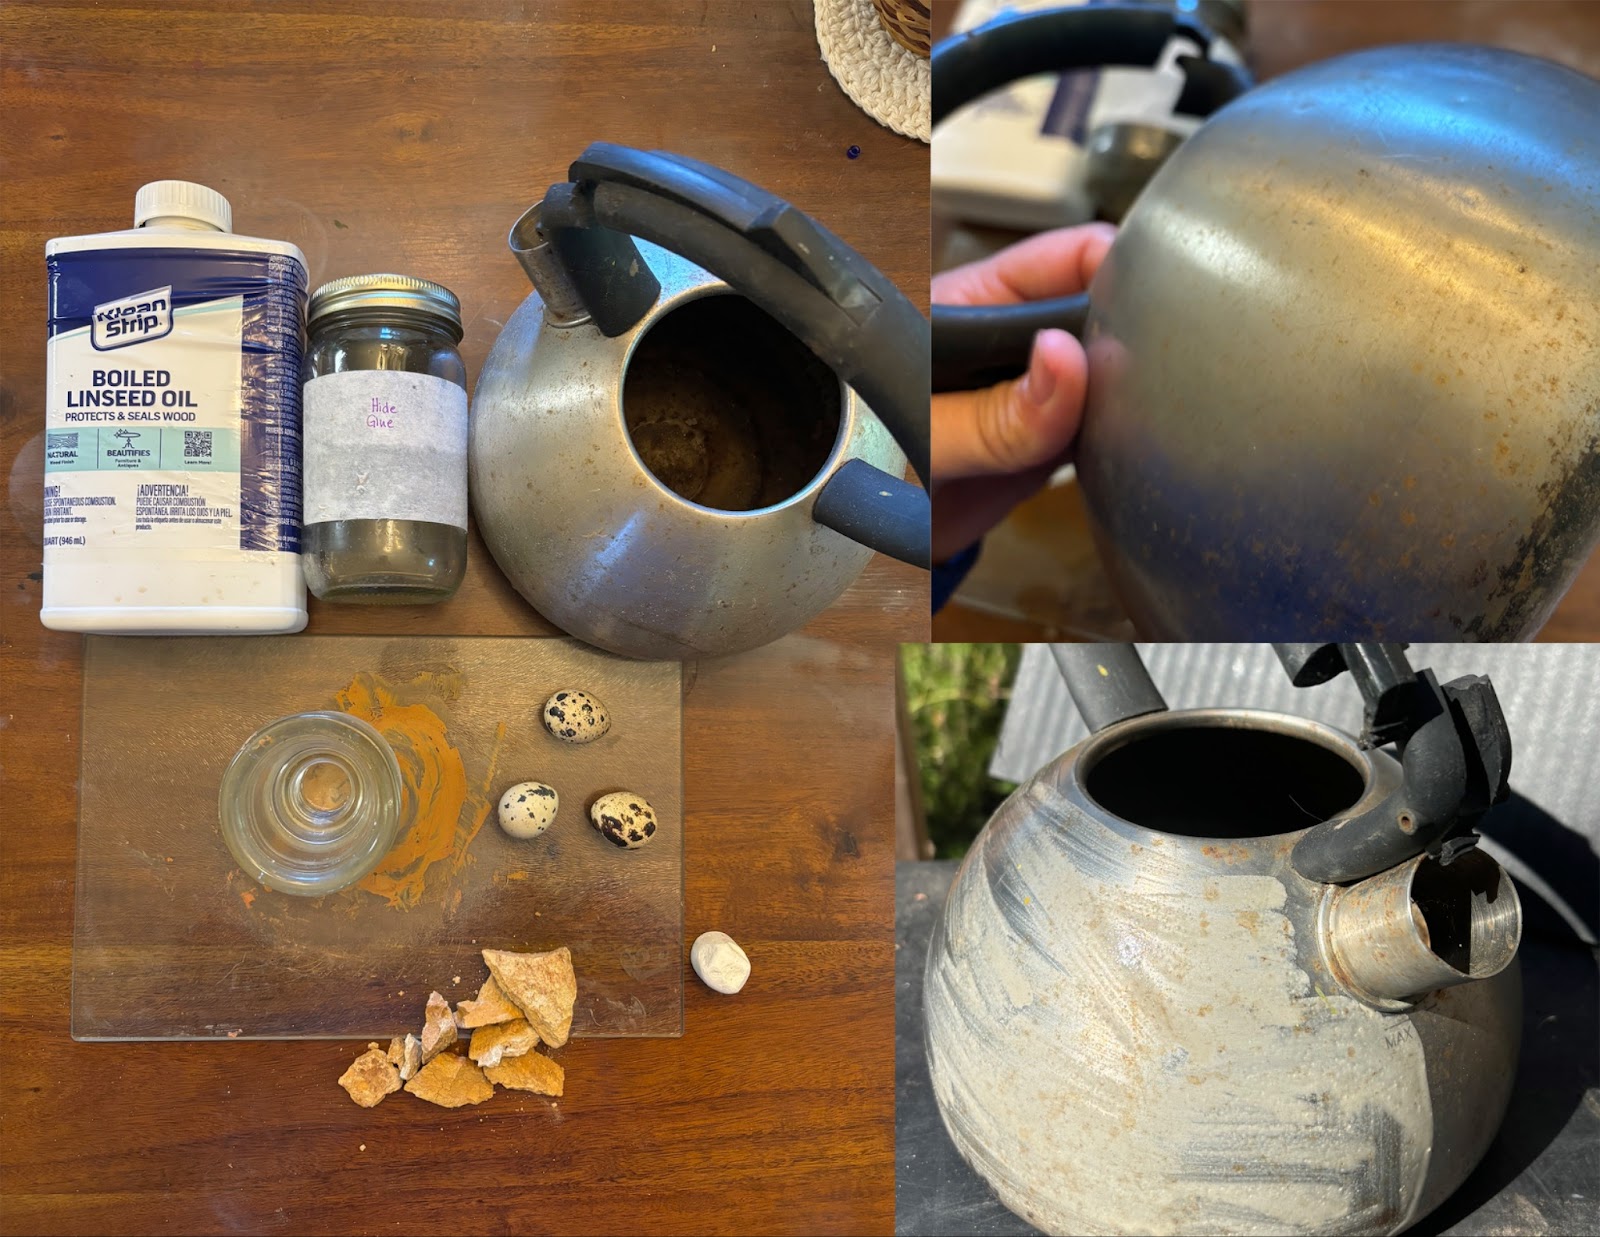
Materials: For all of these paints except the modern acrylic, a roughly powdered, gold ochre from Curtin, Oregon, USA was used. They were applied to an abraded tea kettle base to mimic the texture and curve of plate armor elements. It should be noted that nearly every recorded recipe for any one of these paints differs slightly from each other. Each artist has their own preferences of texture and function. In this experiment, relatively simple but documentable versions of each paint formula was used, but may be adjusted to suit need.
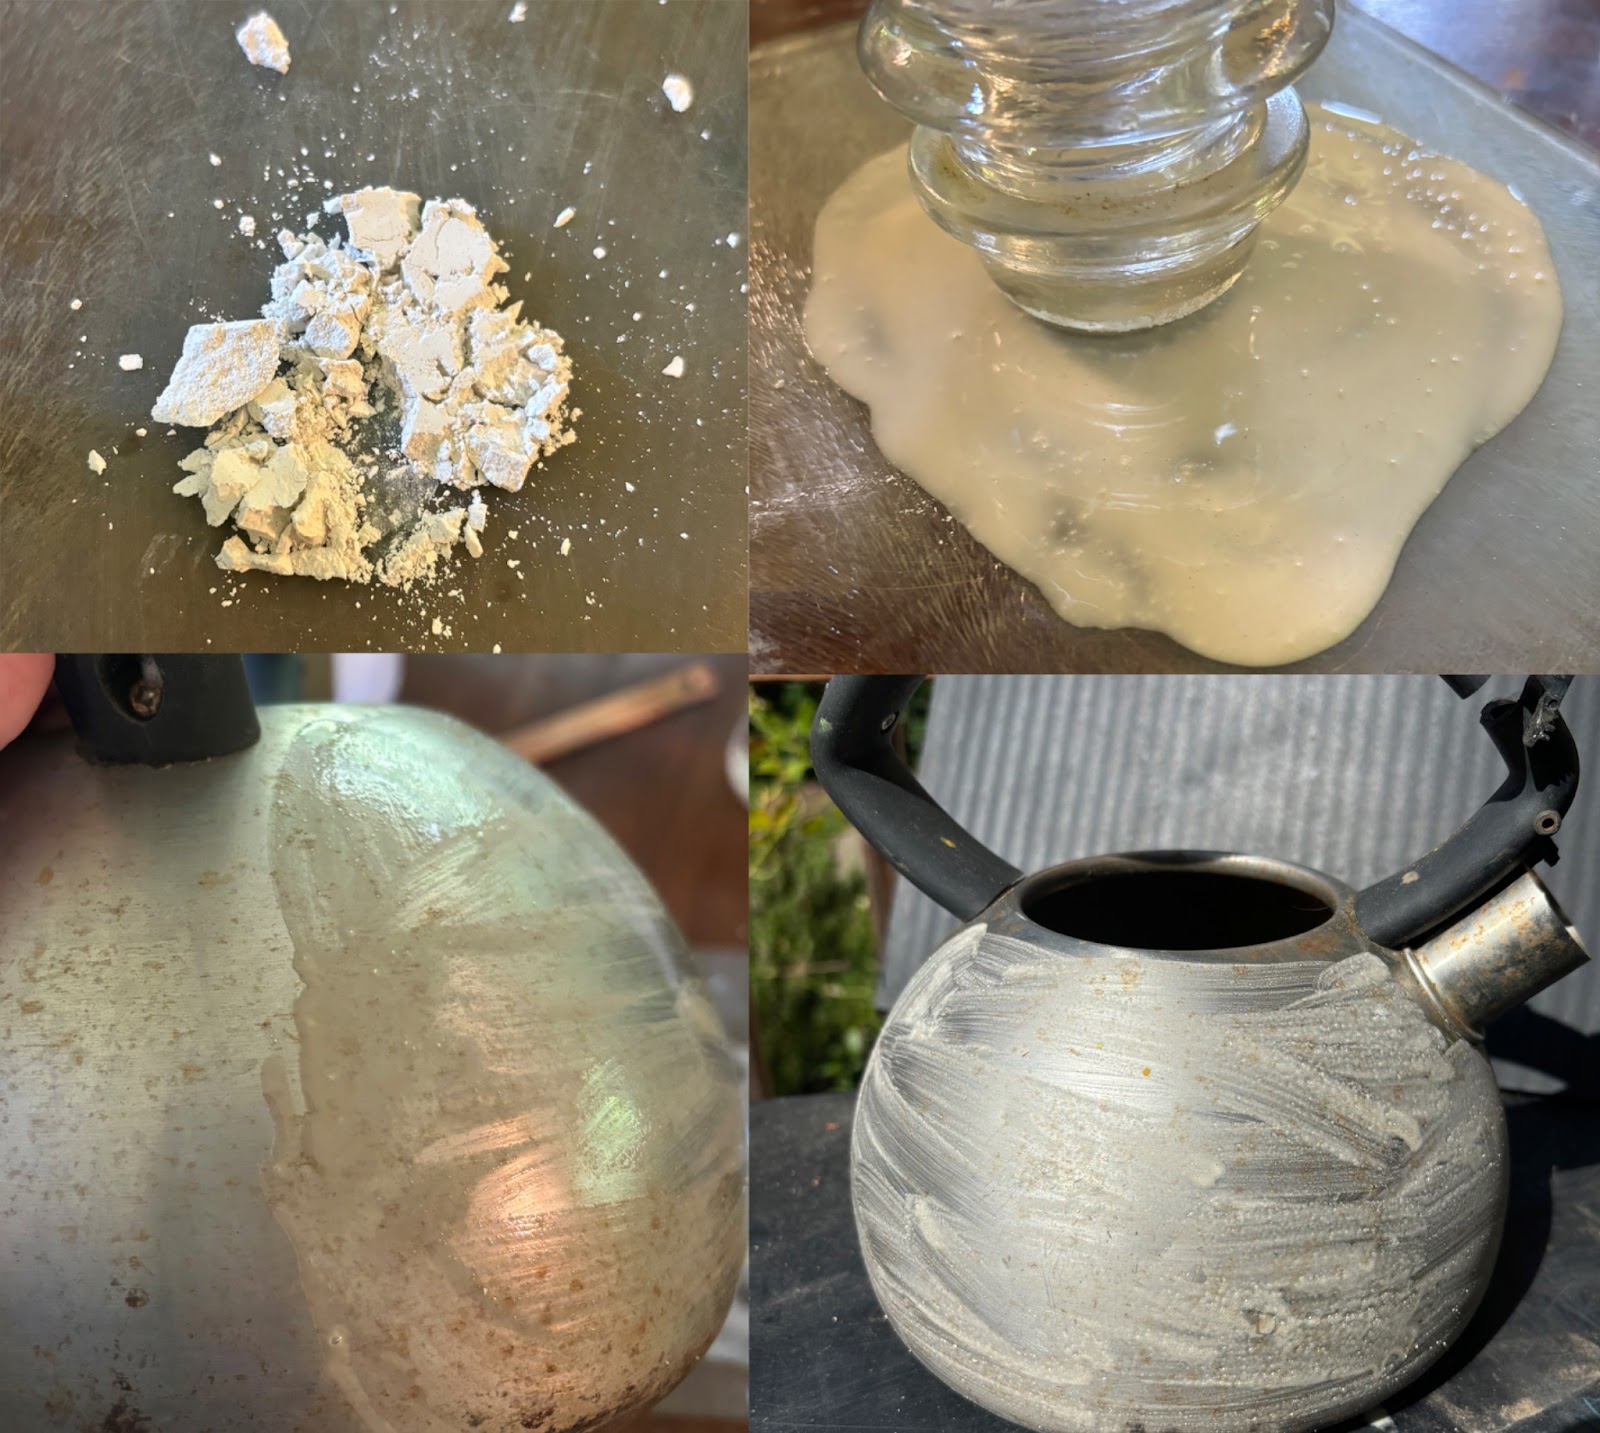
Process: To begin I made a Gesso base layer to paint over half of the surface in order to compare the difference between a bare surface and one with a foundation. The gesso was created by combining equal portions of hide glue (may also use fish glue) as a binder and chalk (calcium carbonate, may also use slaked plaster) as an inert pigment. To this, a drop of honey was added as a humectant to increase smoothness and plasticity. These were mulled together until mixed, but for future projects I would recommend mulling more thoroughly, until the consistency of softened butter.
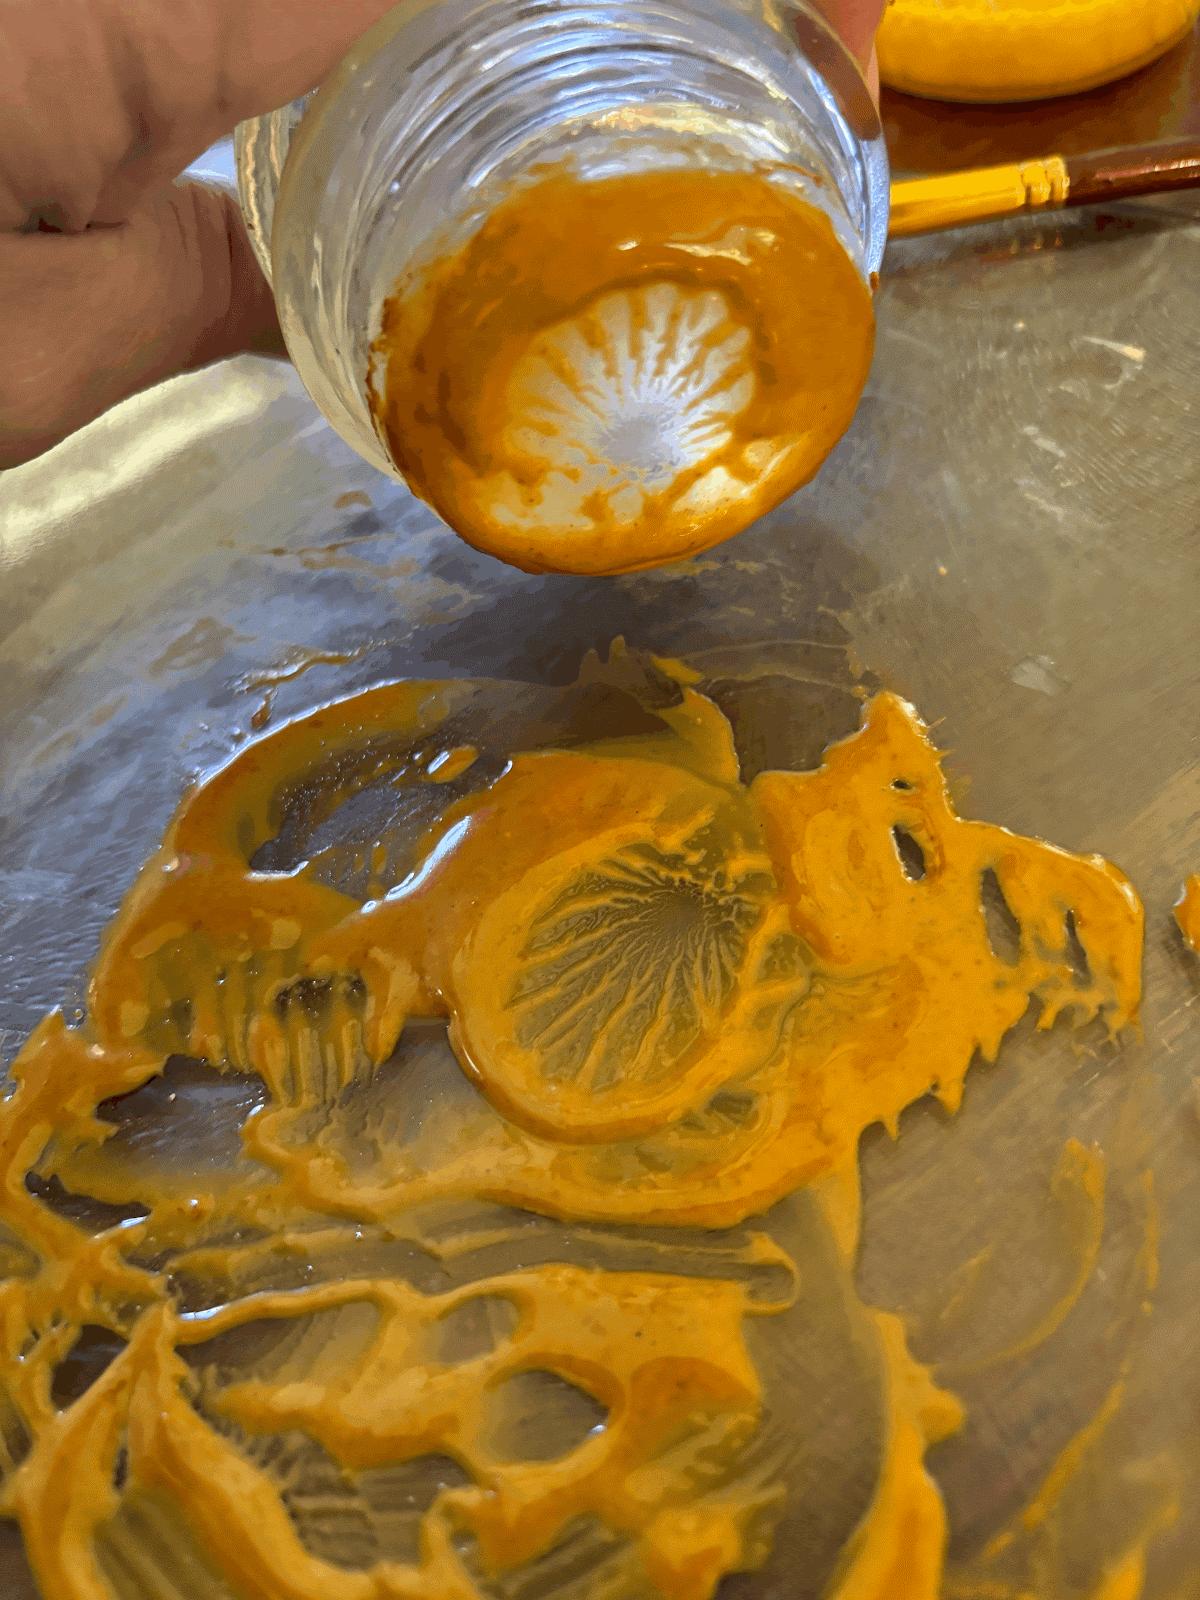
To mull, a hard flat surface (tempered glass cutting board) is needed in addition to a muller. Intentional mullers may be purchased from glassworkers, but a flat topped, glass, electrical insulator accomplishes the same results. First make a small pile of your dry materials in the center of the board and create a little well in the center. Into this well pour your liquid ingredients. With the flat surface of your muller, grind the materials against the board in small, ever-widening circles to blend and further reduce the particle sizes. If it becomes too spread out, use a palette knife or spatula to bring the solution back to the center and repeat. This process can take anywhere from five minutes to an hour, depending on how smooth you want your final product to be and the hardness of your dry materials. This process is used to create all the paints as well.
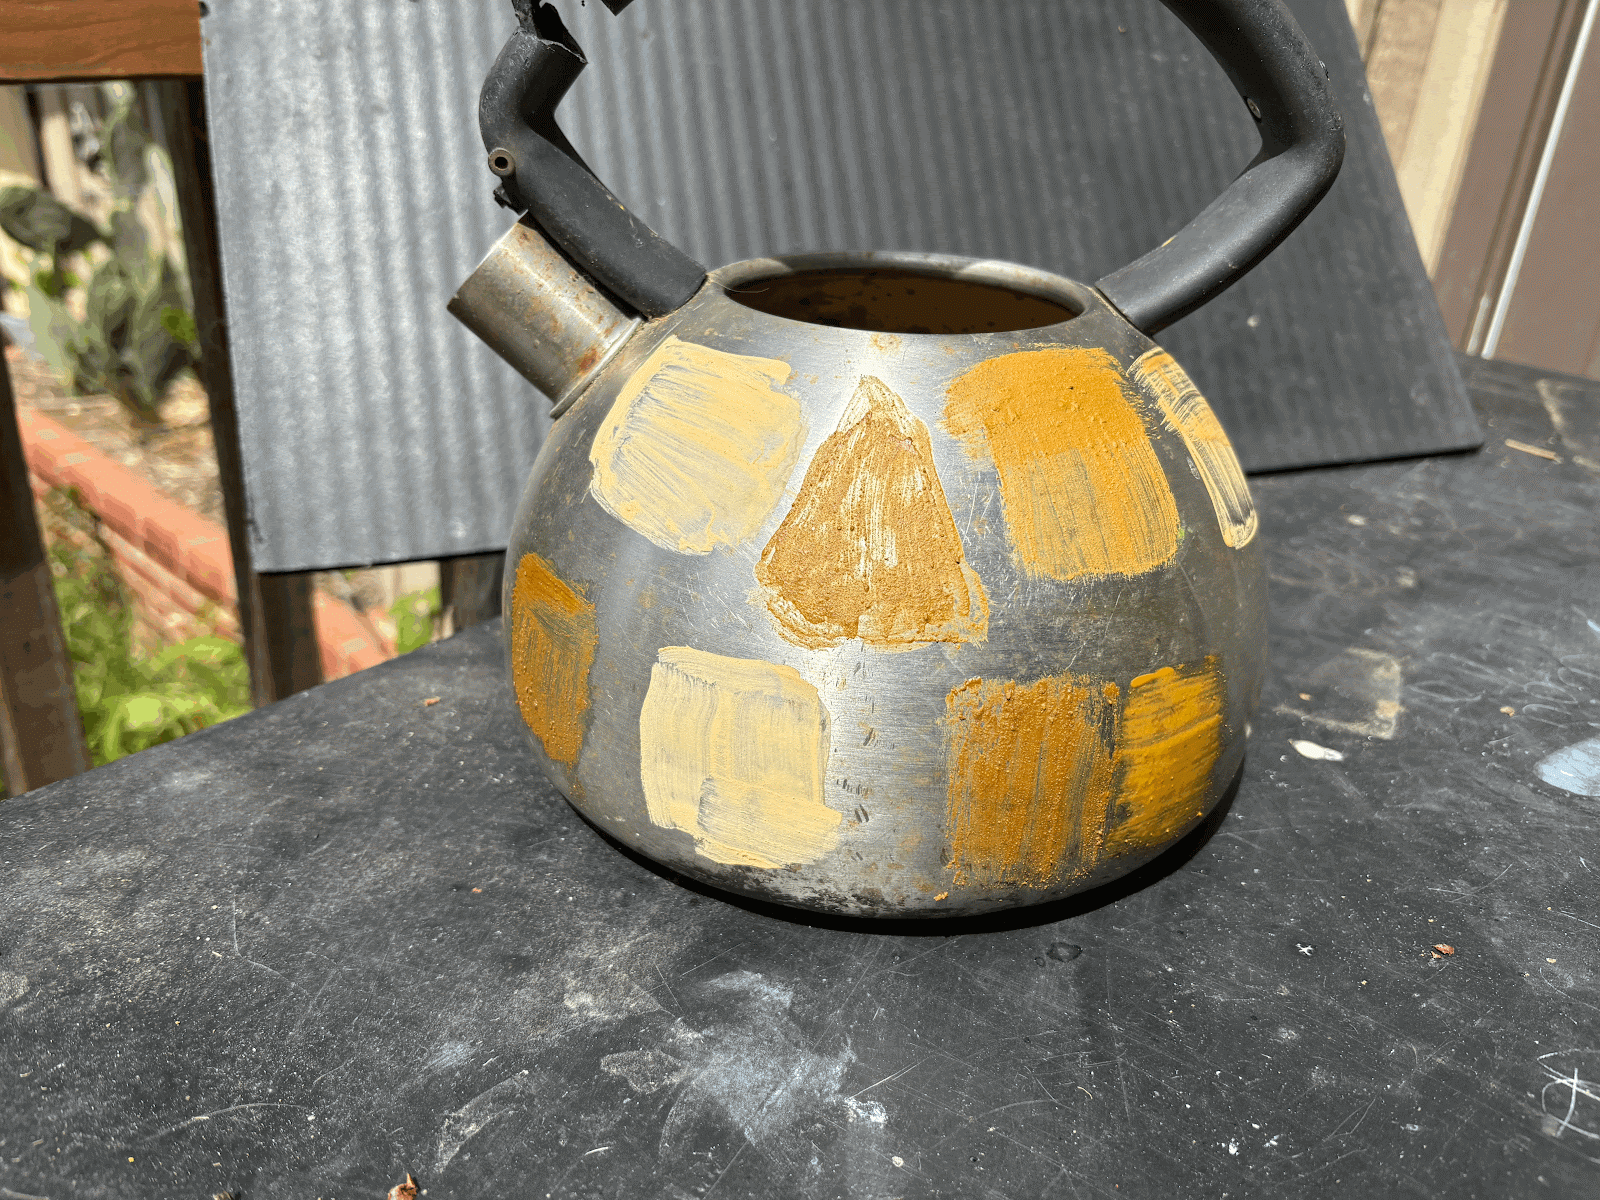
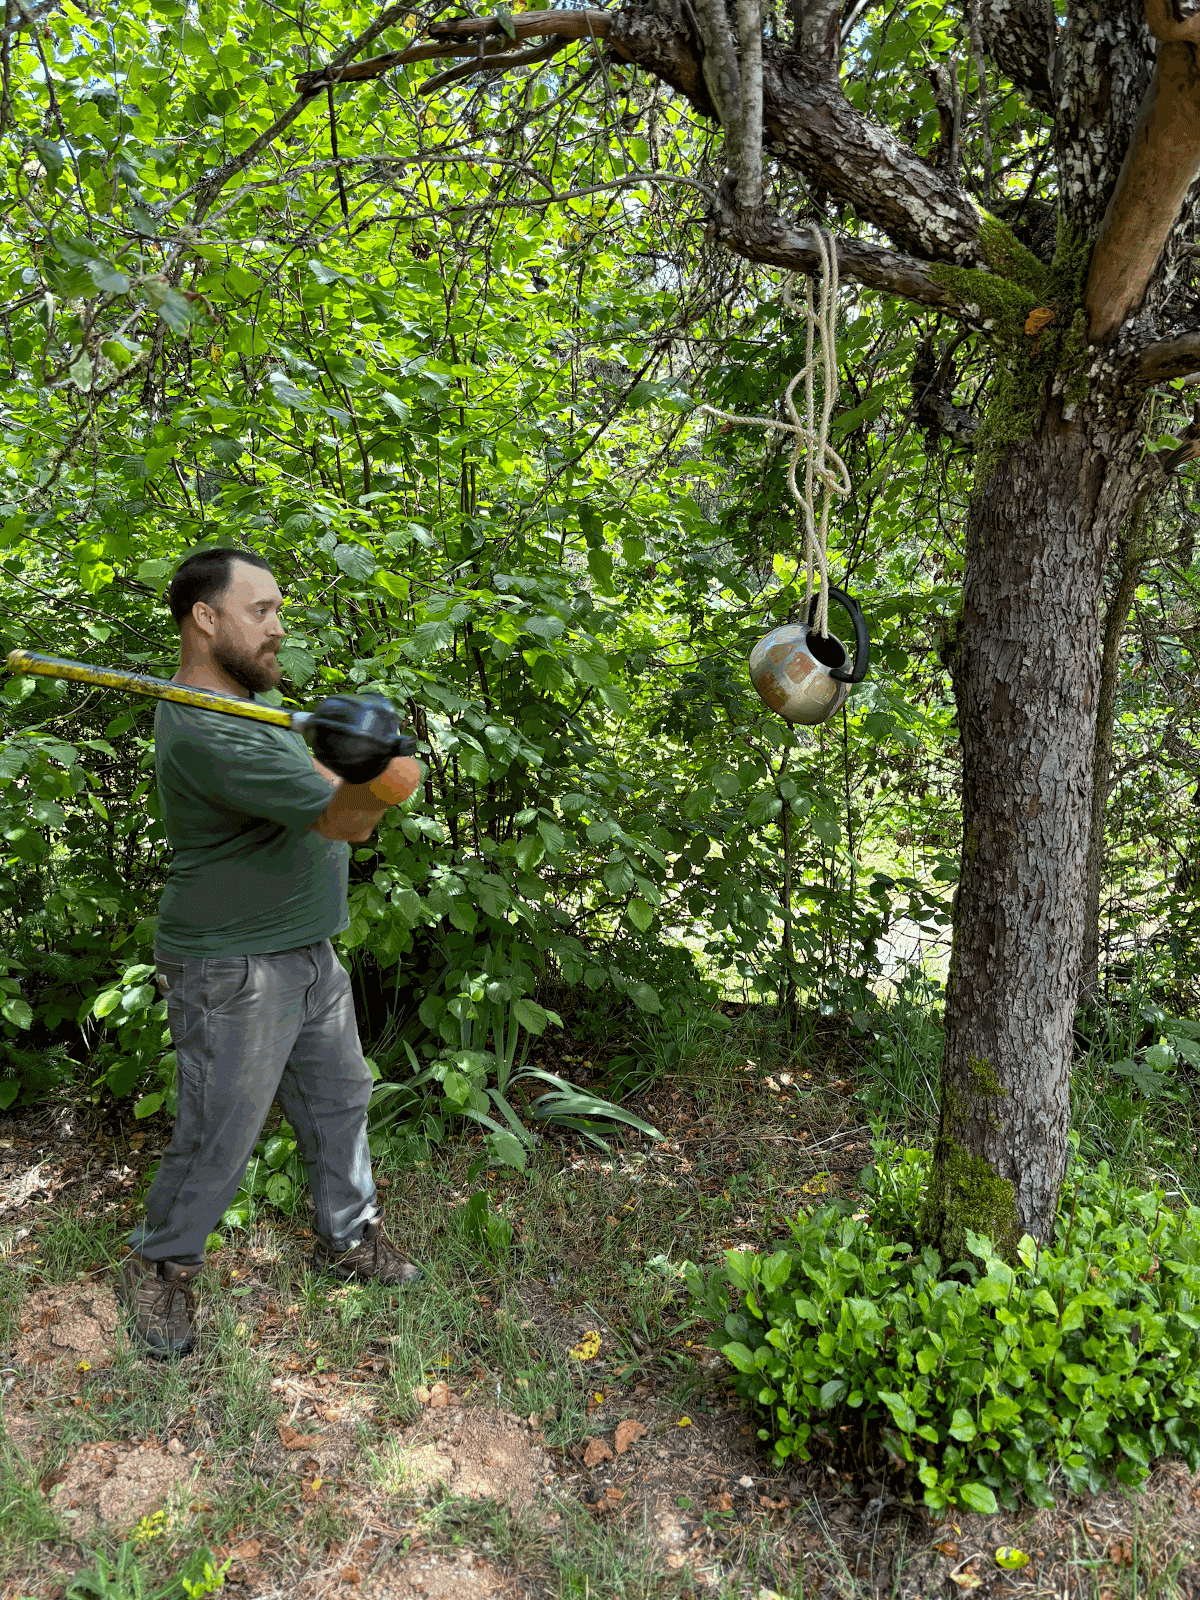
After application, the paints were allowed to dry 48 hours before being tested. Adhesion was determined by how well they adhered to the metal and covered the area. Durability was tested in a scratch test done by wooden chopsticks, a drop of water applied by fingertip, and flexibility by being hit with a rattan sword.
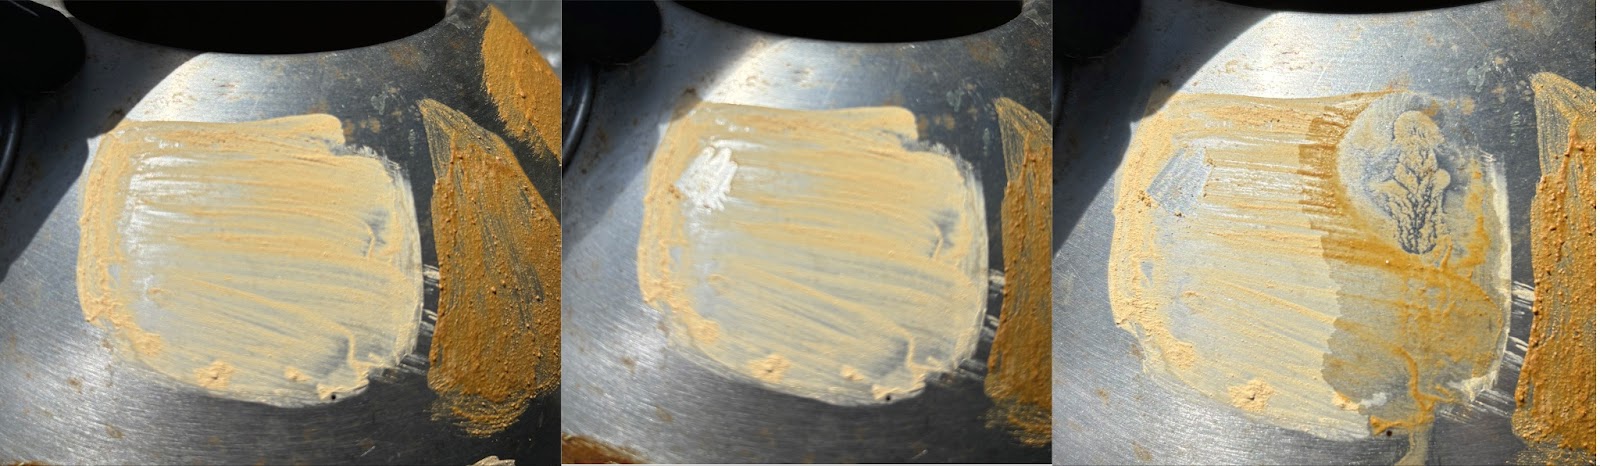
Once the gesso was dry, I began creating paints and painting two patches on the kettle of each type: one on the bare surface and one over the gesso. The most simple paint was first, which is simply water mulled into the ochre powder. As seen in the furthest left image above, the coverage was decent once it dried. However, it readily shed large patches as you can see in the scratch test in the center, and it immediately dissolved in a drop of water.
The simple water paint over gesso performed in almost exactly the same manner, although it didn’t scratch off quite as easily.
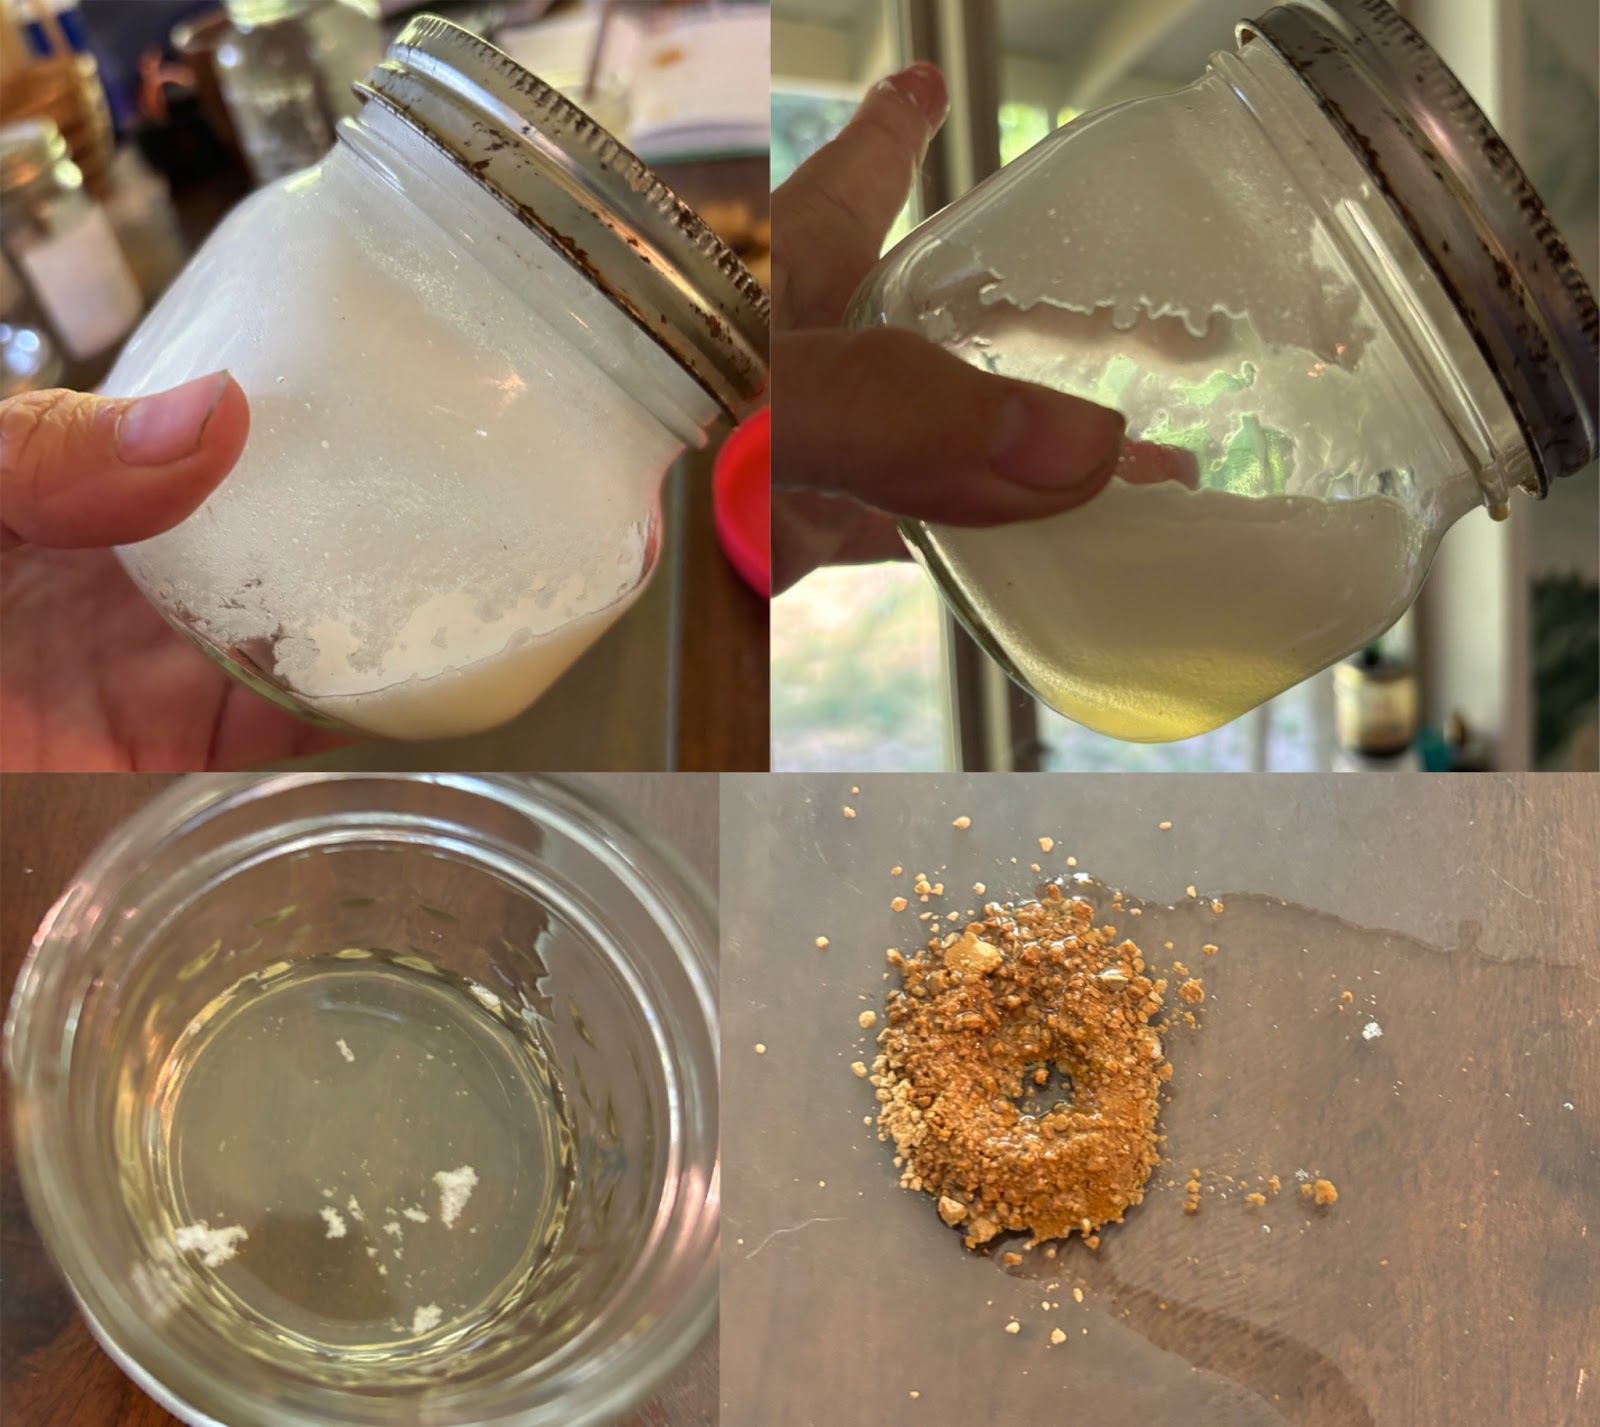
The next set of paints include eggs. To begin these, I first needed to separate the egg yolk from the whites. With the whites I then processed into a glair as pictured above. The purpose of this process is to create a solution with uniform consistency that can last quite a long time. In fact, it is considered to improve in quality as it ages. To make glair, whip egg whites until they create stiff peaks. Tilt container and allow to settle. This may take anywhere from a few hours to a full day. A slightly yellow liquid will accumulate at the bottom that should pour off apart from the remaining froth. This is glair. Some recipes call for a drop of honey for increased elasticity or a drop of vinegar for preservation purposes.
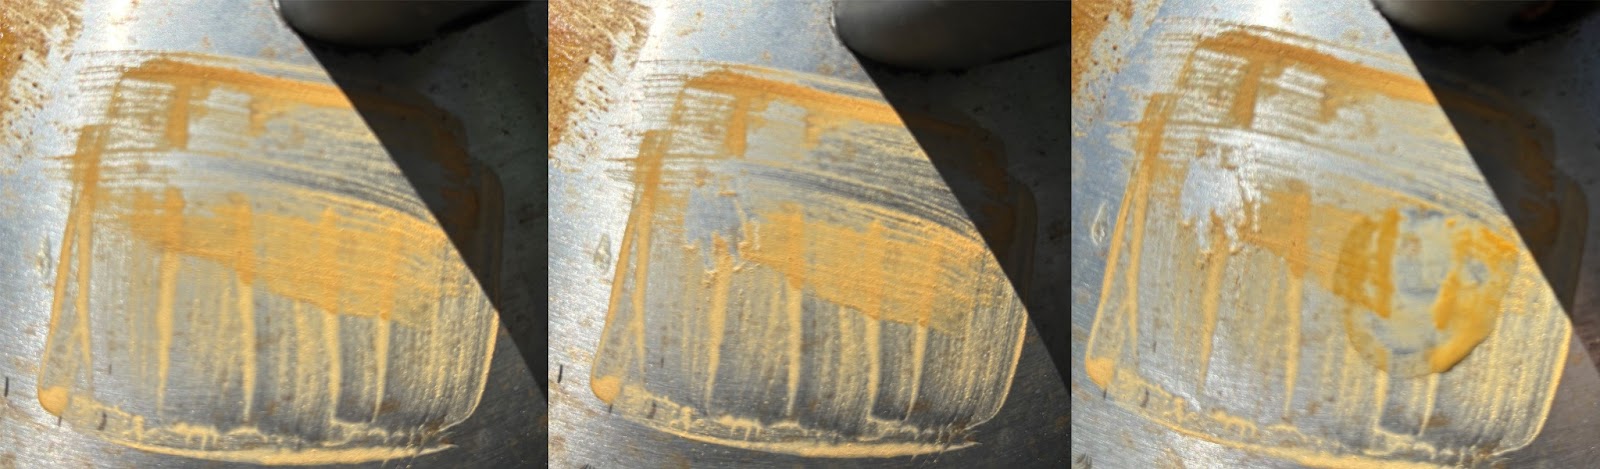
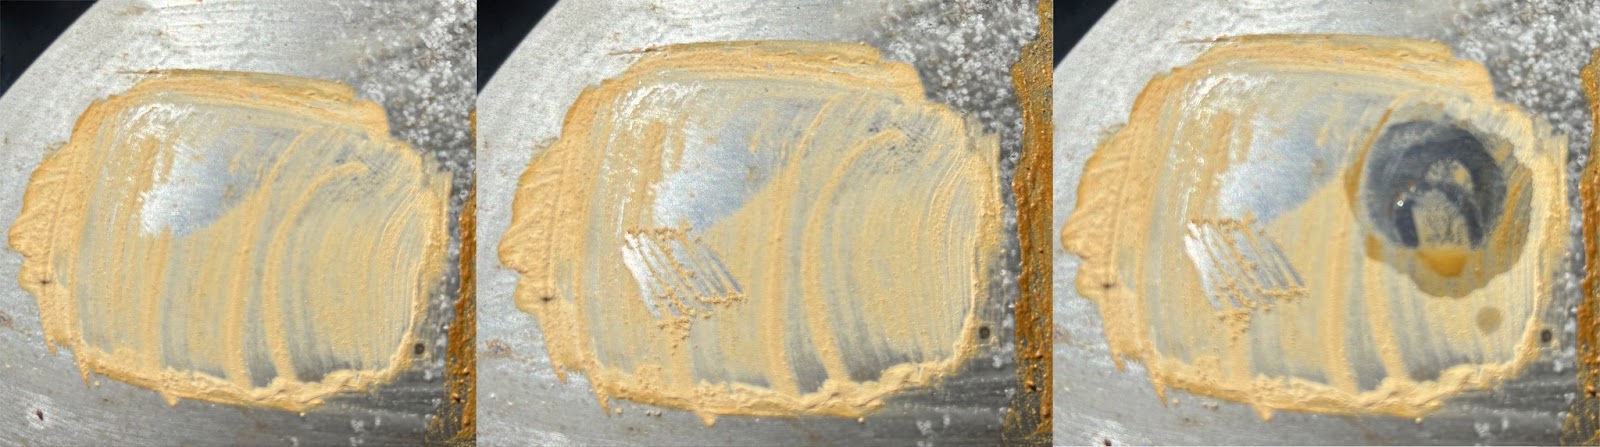
Paint made from eggs is considered very strong, but can crack over time. Although I excluded adding honey for these tests, it may be added to all the egg-based paints to increase elasticity and longevity. Above shows the glair paint (made by mulling glair with ocher powder) on the bare metal. The adhesion was relatively minimal. Multiple layers helped but only where it did not wipe off the previous layer with the brushstrokes. The second image shows the scratch test removing the full area and the last image shows some lifting with the water test.
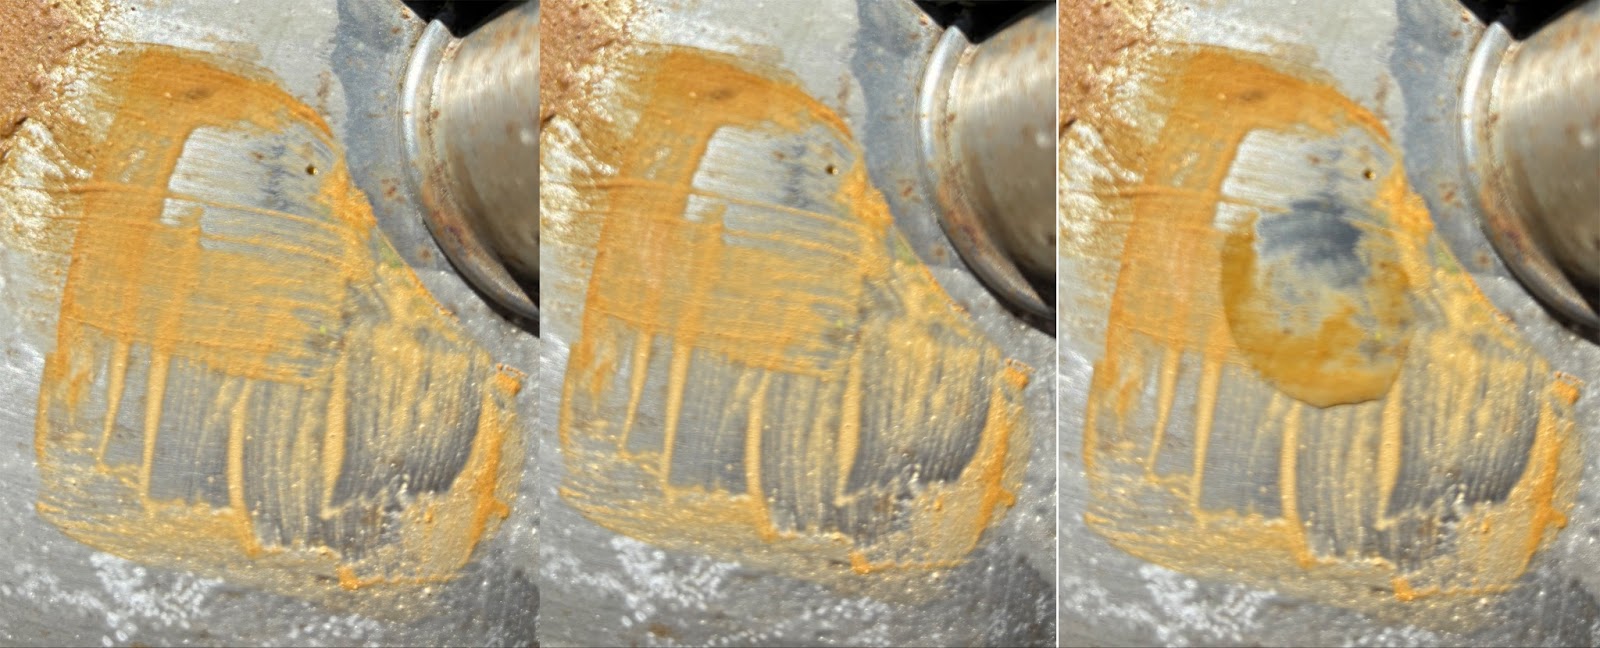
The glair over gesso adhered slightly better. No paint came off in the scratch test, and the scratches can barely be seen. However, it did lift with the application of water.
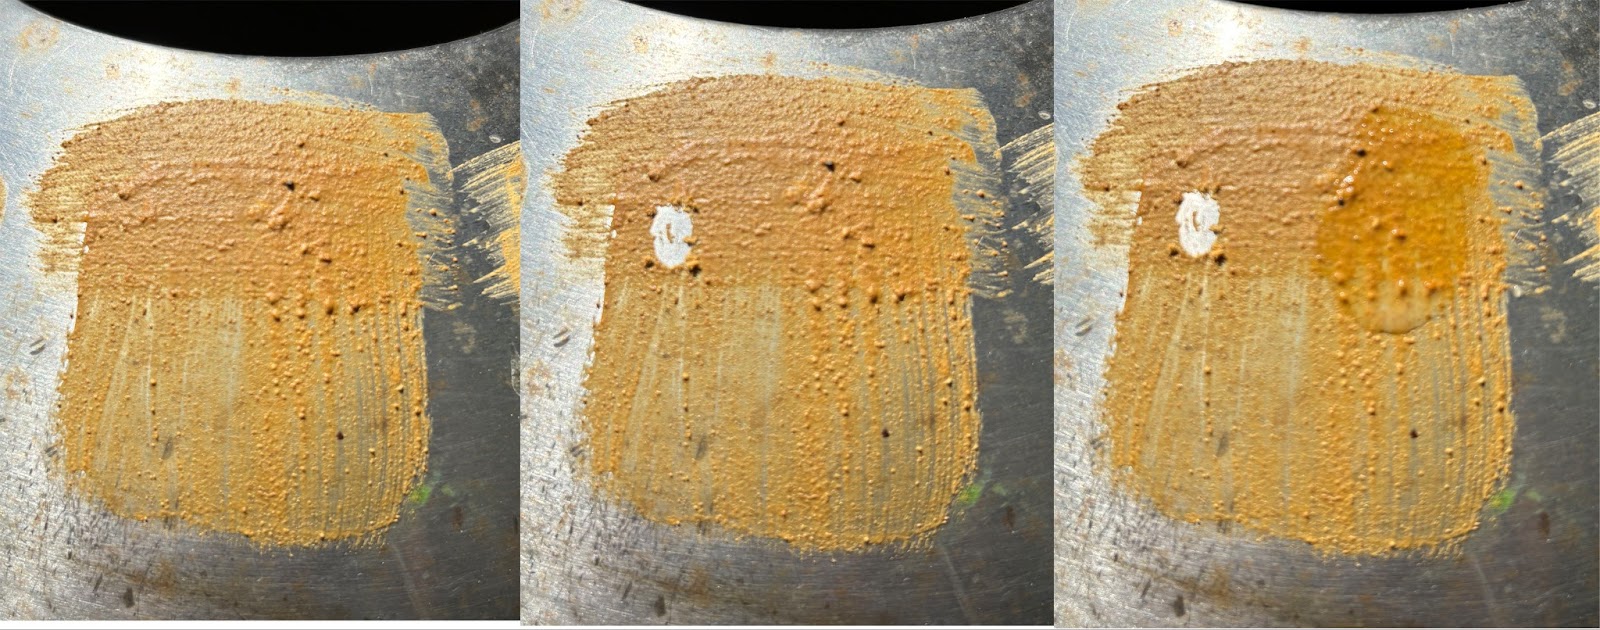
The egg yolk adhered thickly and consistently, even over the bare metal and took a second coat without dislodging the first. It did readily scratch from the unprimed surface, but was unmoved in the water test. The increased fat content of the yolk increases its ability to repel water.
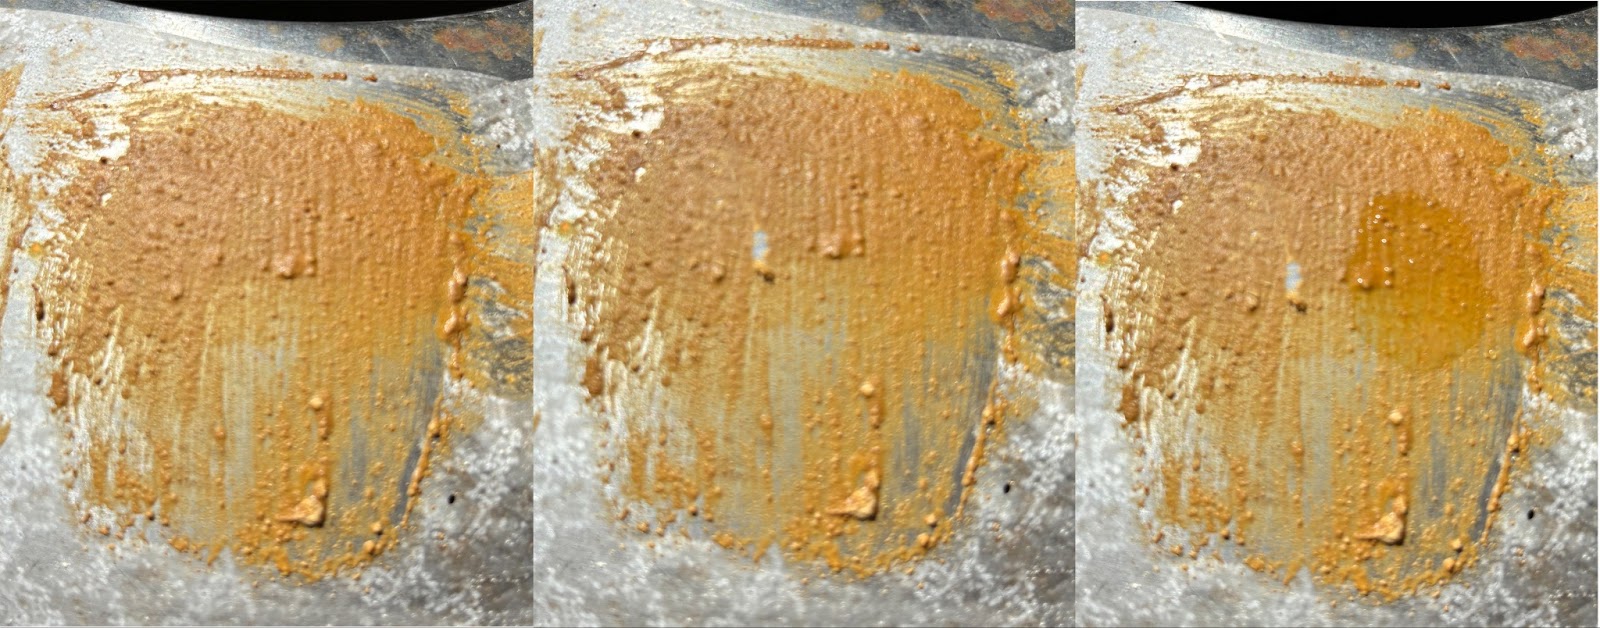
Over the gesso layer, the yolk performed even better. It adhered well and could barely be scraped off in the scrape test. It also showed the same water repelling properties in the water test. This is the first mixture that I could imagine being used as a relatively sustainable and viable metal paint process.
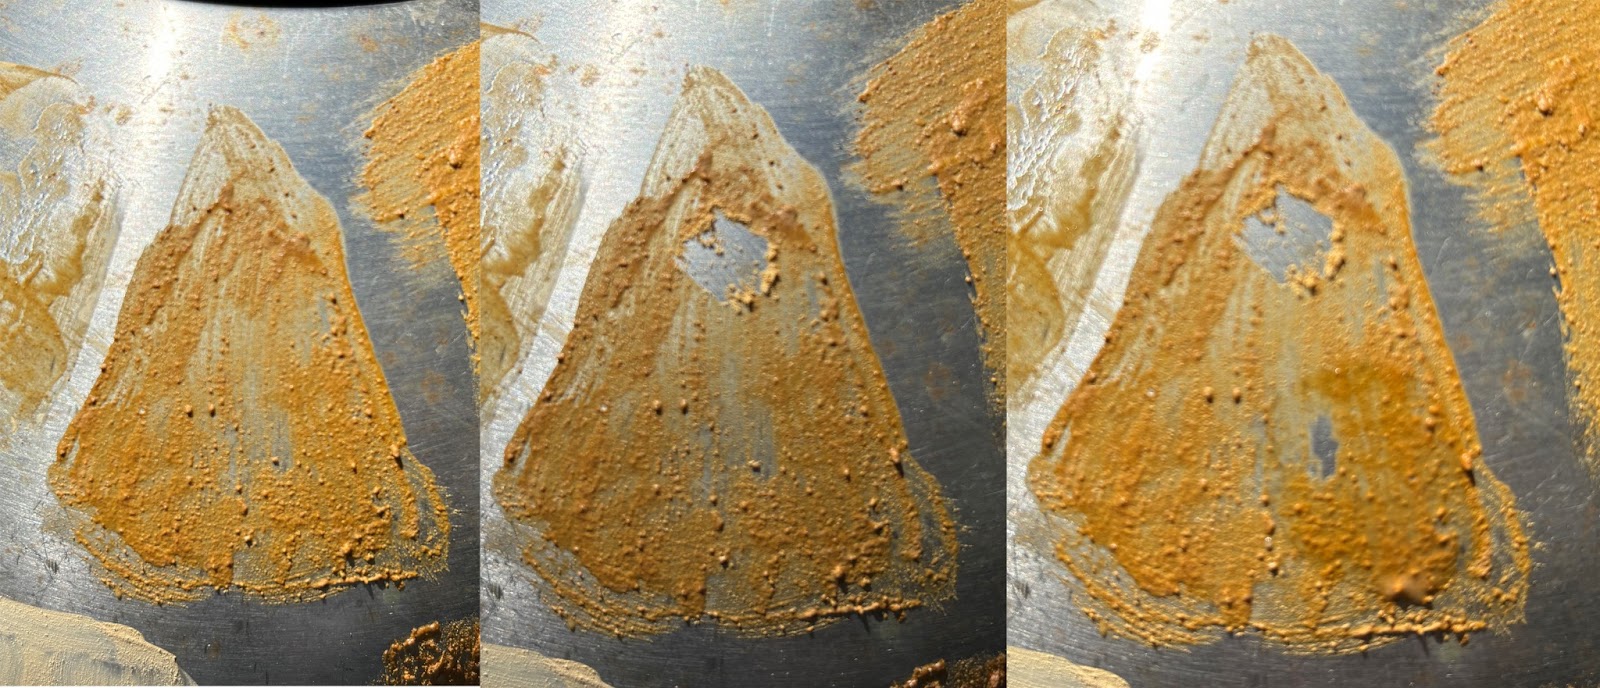
The next paint is called full egg, but it was made by combining the yolk and the glair together with the ochre. While it adhered comparatively on the bare metal, the scratch test performed similarly to that of the glair, removing a whole section, and the water solubility of the glair caused some lifting in the water test.

These characteristics were improved with the whole egg paint over the gessoed metal. The adhesion was more uniform, the scratches were almost imperceptible, and the water only slightly lifted the paint.
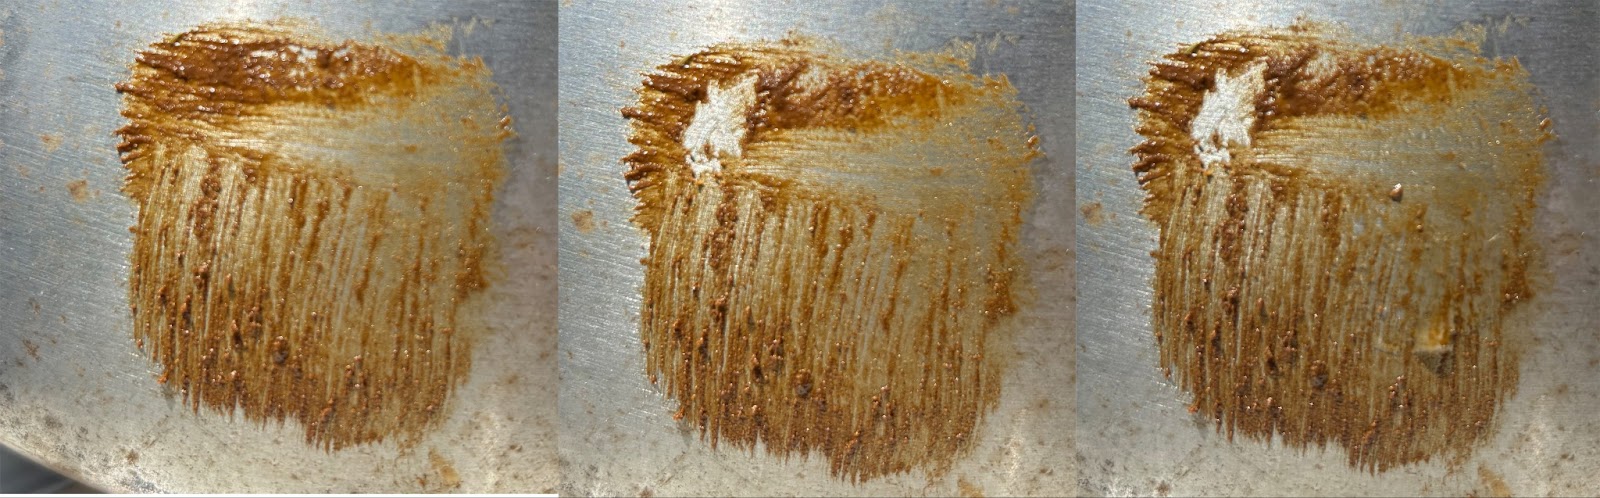
Linseed oil is made from pressed flax seed. It was used to make oil paints beginning in the late middle ages and through the renaissance. While boiled linseed oil is fairly readily available, artists during this time were known to let it “harden” between 2 to 20 years to increase the viscosity. I went into this next test knowing it would be a thinner paint and may not fully dry. This swatch, pictured above, was allowed to dry 48 hours before testing. The oil is effective in saturating the color of the pigment, causing it to appear darker. In the test seen above on bare metal, the adhesion is expectedly thin and scratches off quite easily. However, because of the nature of the oil, it was very resistant to water.
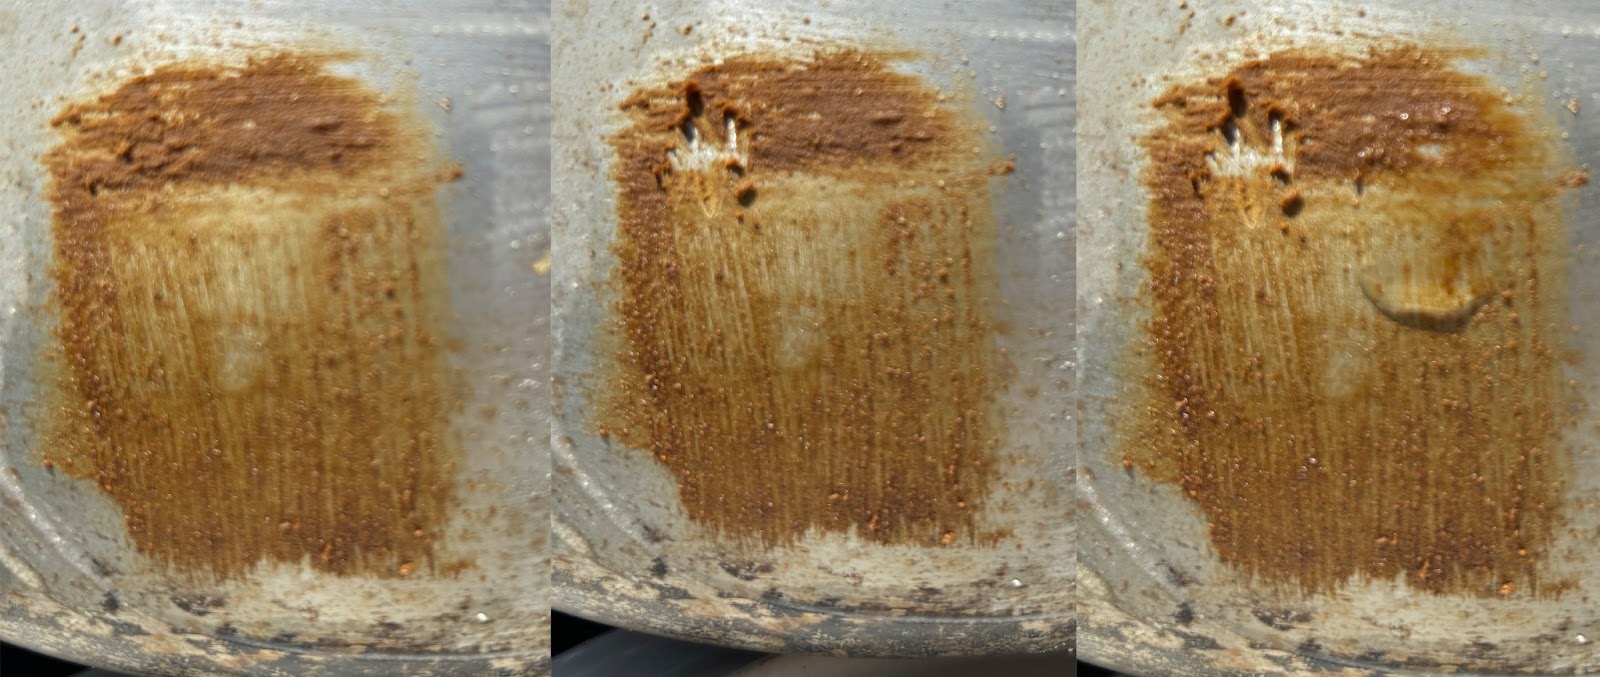
Despite its thinness, the oil paint adhered surprisingly well to the metal with the gesso layer. Its scratchability also improved slightly and water resistance remained the same.
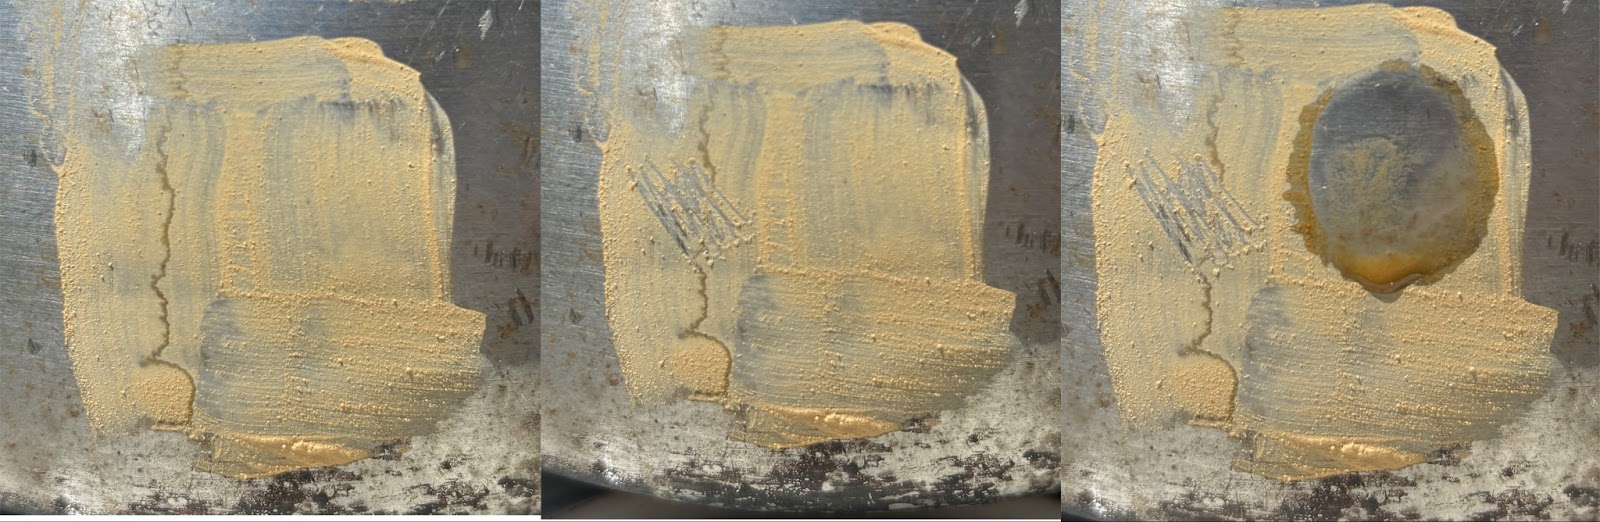
Next up, the hide glue was tested, first on the bare metal. Hide glue is often used for its added strength and adhesion. I did cover the bare metal fairly uniformly, and only was scratched at the absolute edge of the chopstick. However, since it is a water soluble solution, the pigment was lifted during the water test.
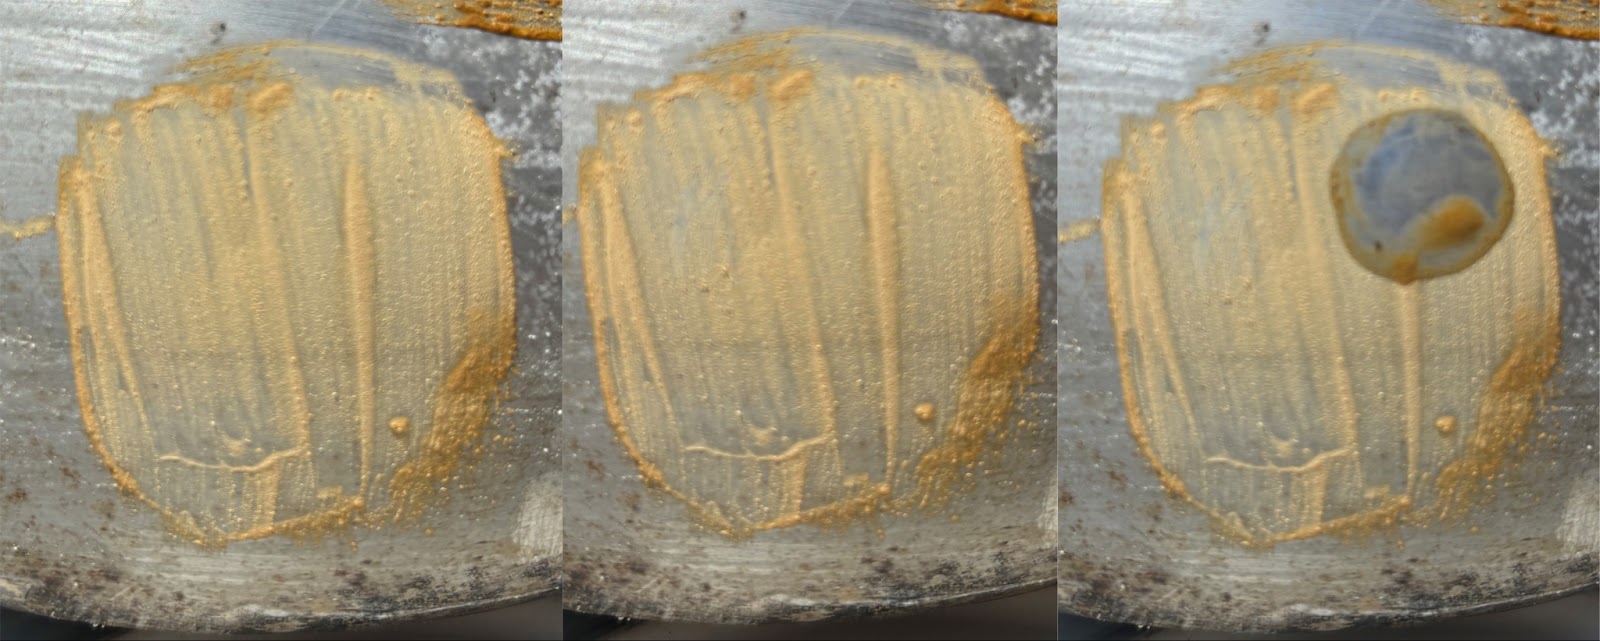
On gessoed metal, the hide glue performed even better. While possibly slightly less uniform, I was unable to scratch the pigment off at all. It did still lift in the water test, so this might work as a decent temporary paint.
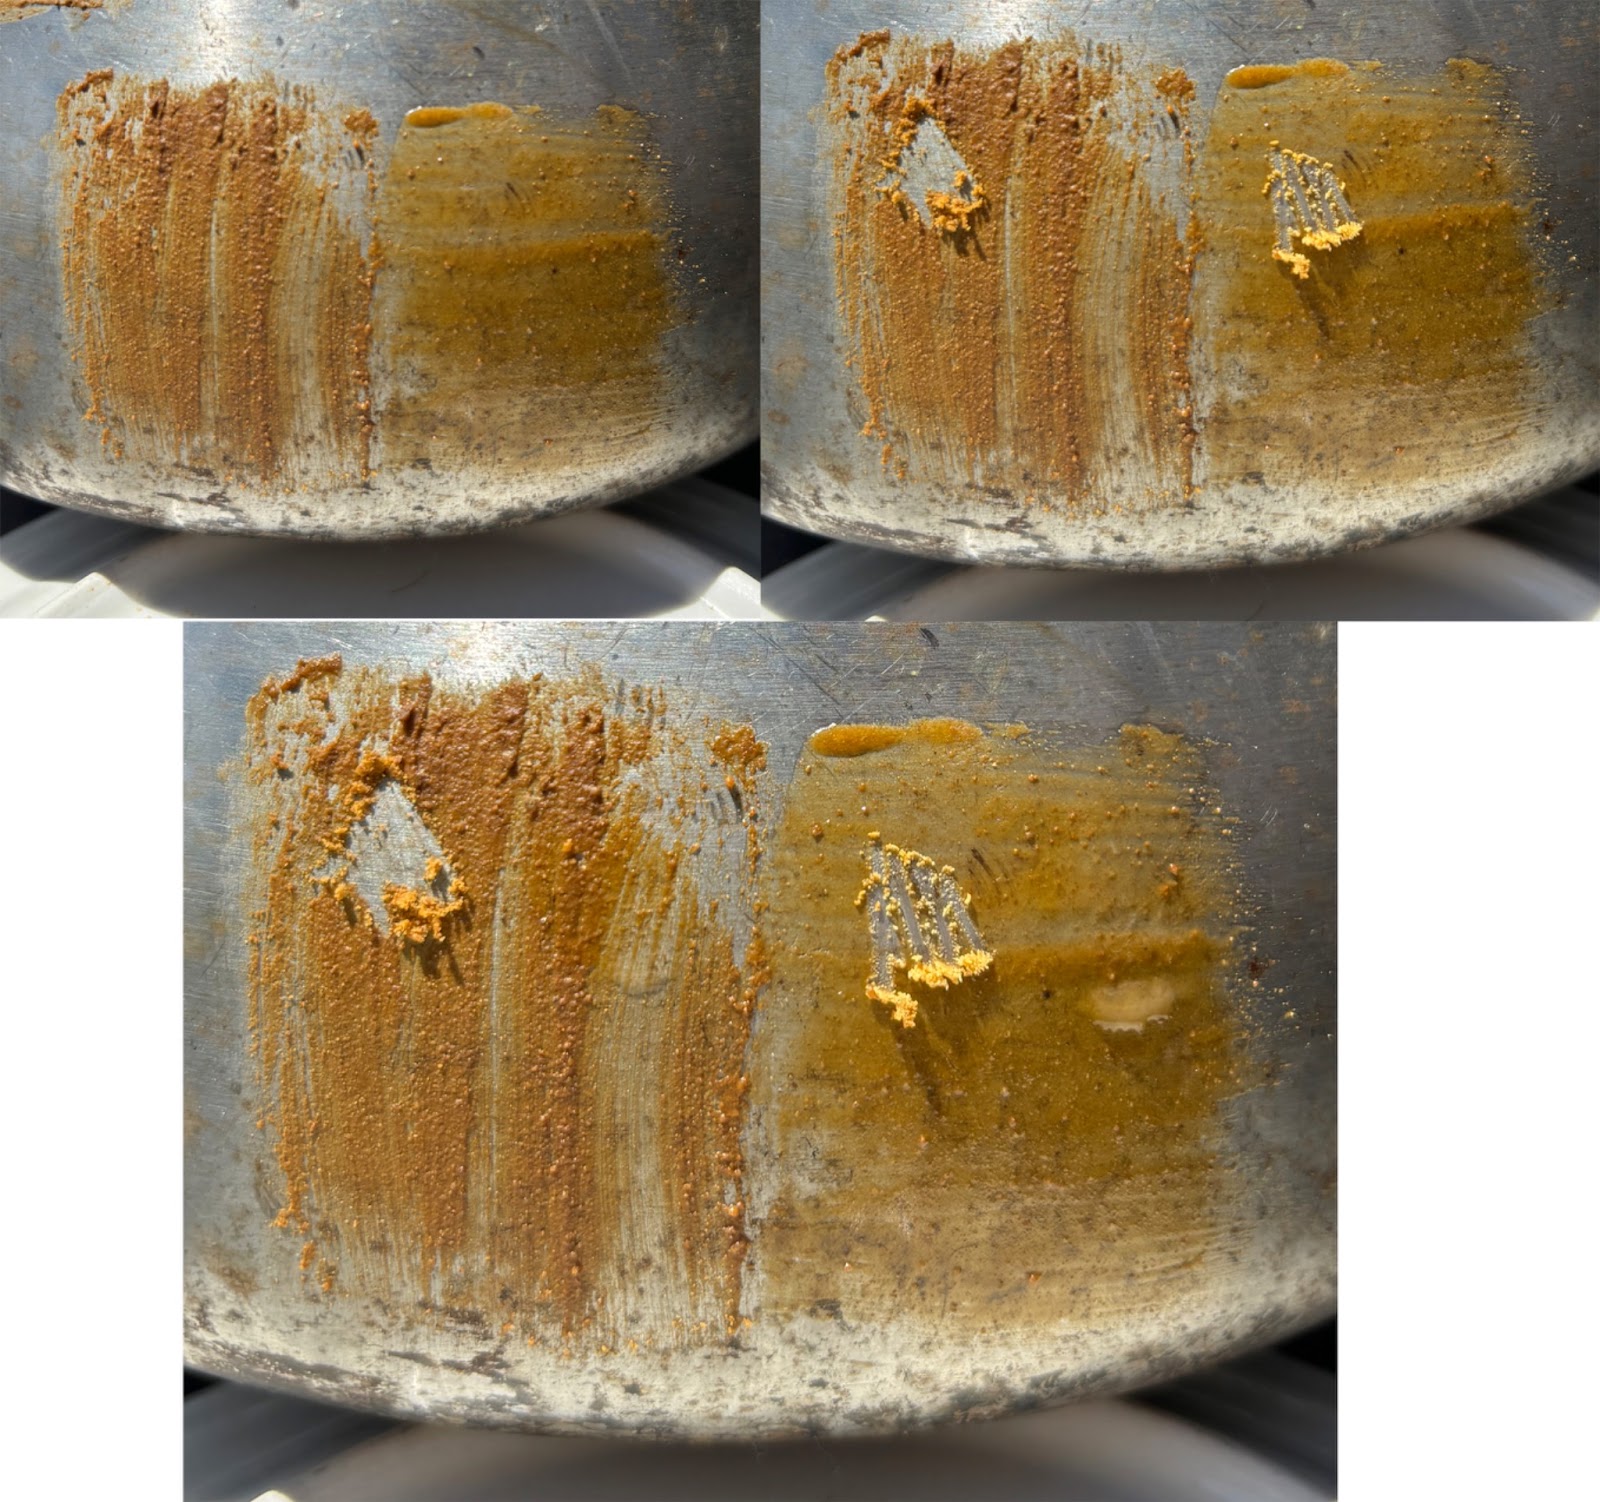
Now we come to the egg tempera paint. This paint was the most popular formula to be used for frescoes and panel paintings as well as a number of manuscripts. It is known for its spreadability and durability. In my test photos, there are two swatches in each. This is because my first proportions were unbalanced, leading to an especially dry paint. After adding more of the liquids, the texture was my favorite of any of the paints that I tested. It went on so smoothly and thick where it adhered.
To make tempura paint, mull pigment powder with equal parts whole egg and linseed oil. Adjust as needed. On bare paint, the refined consistency (lighter colored paint swatch on the right of each individual photo) applied very smoothly and showed great coverage. While it did scratch off, it stuck to itself. This lifting may be due to fresh oil and not entirely hardened dry. The paint was completely waterproof.

On the gessoed side of the kettle, the tempura didn’t stick quite as well, perhaps due to the coarseness of the surface. But where it was thick enough, it spread on smoothly and evenly as before. Only one stroke of the scratch test lifted the paint, and it maintained its resistance to water. This is the second paint I would recommend for metal armor.
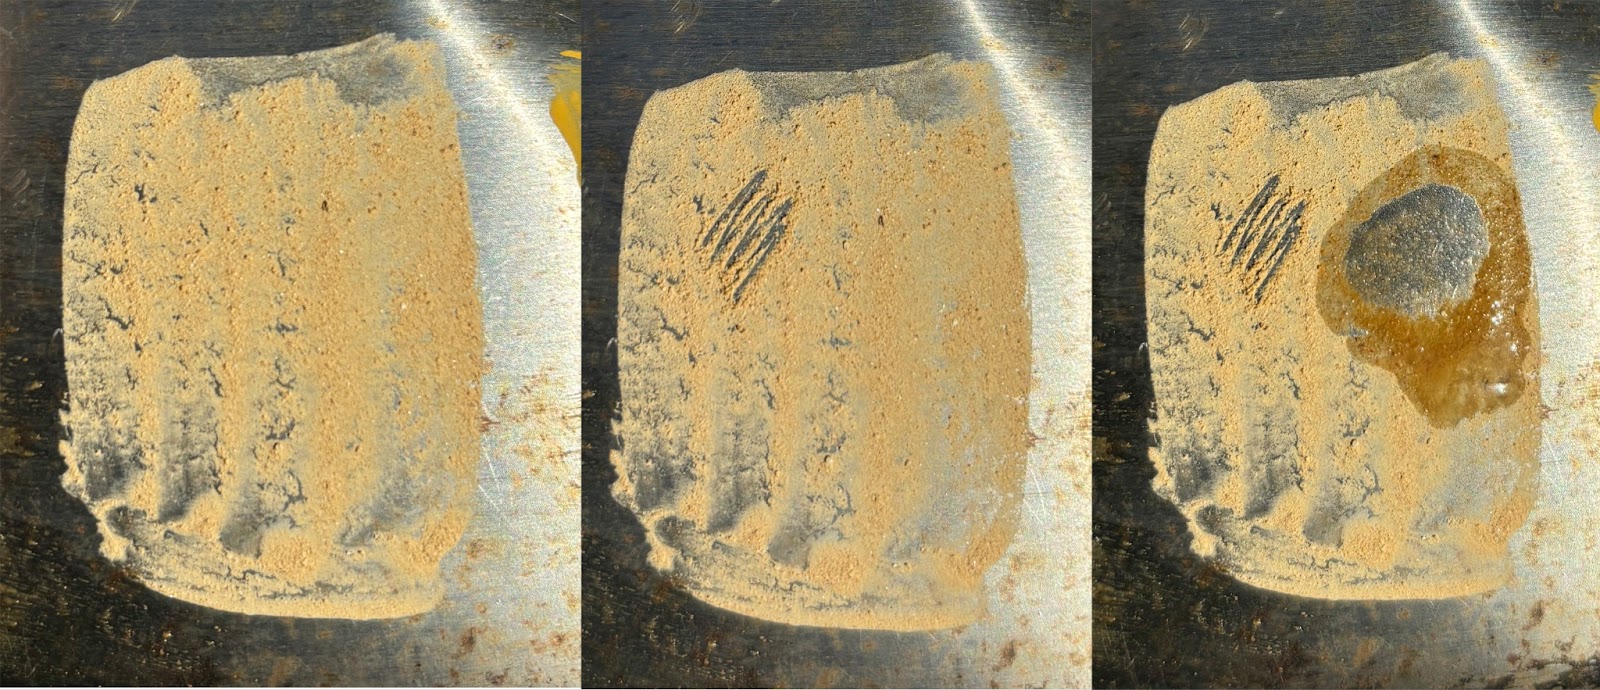
One of the most common paint-making methods for medieval scribes is gouache, which mulls the pigment with dissolved tree resin. Gum arabic seems to have been used the most in surviving manuscripts, though there is documentation of the use of other stone fruit trees such as cherry and plum. While the gouache adheres well enough to parchment and paper, it is evident in the first photo how it is already pulling away from the bare metal. It easily scratched off and quickly dissolved into the water applied.

Painting the gouache over the gesso greatly improved its adherence and it was so strong, I was surprisingly unable to scratch it! The gouache is still water soluble, though. This would be my top choice for a temporary armor paint.
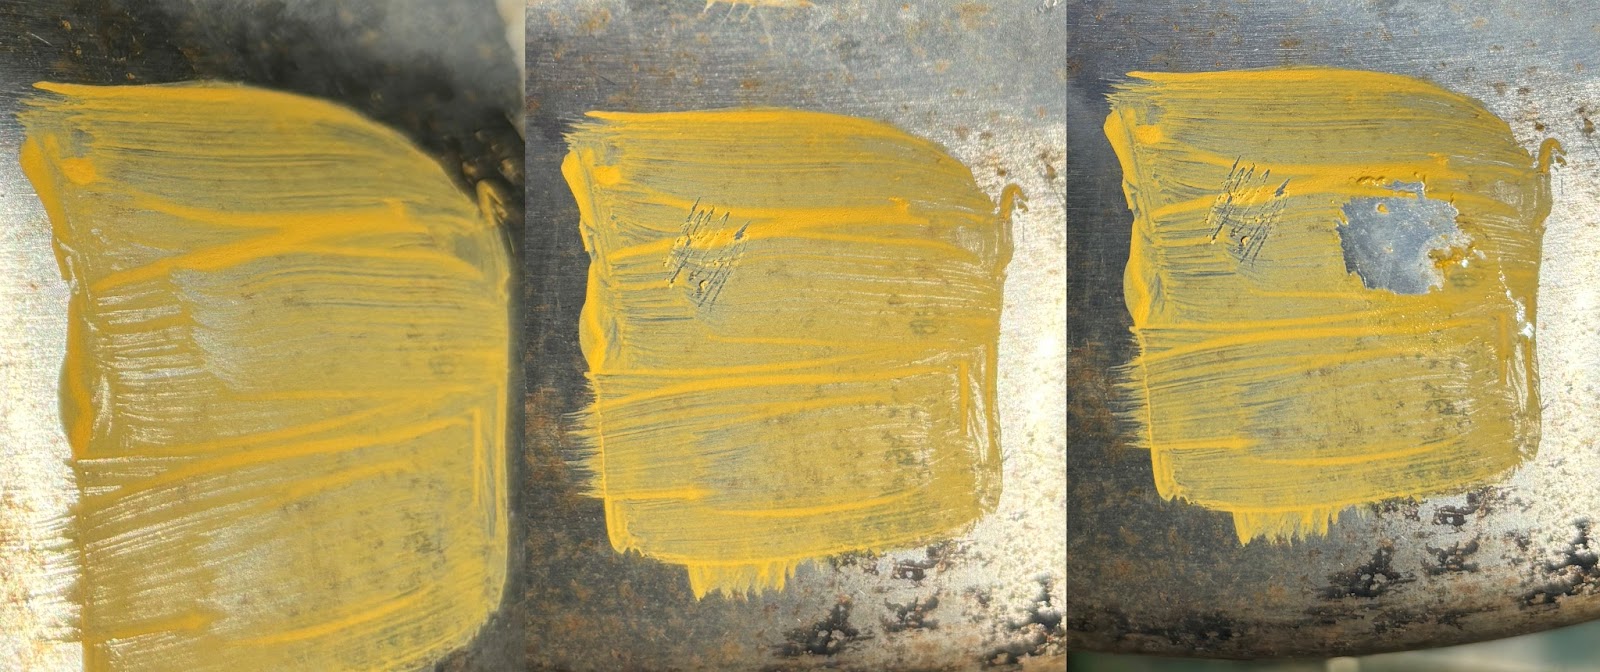
Finally, I decided to test modern acrylic paint in the same manner. This is a plastic based paint that is often used by modern reenactors for its ease of use and durability. Though this paint had very small pigment particle size in comparison the ones I made, it did not have very consistent coverage when applied in a similar thickness onto the bare metal. It partially scratched off and, though it’s waterproof, quickly sloughed off the metal when water was applied.
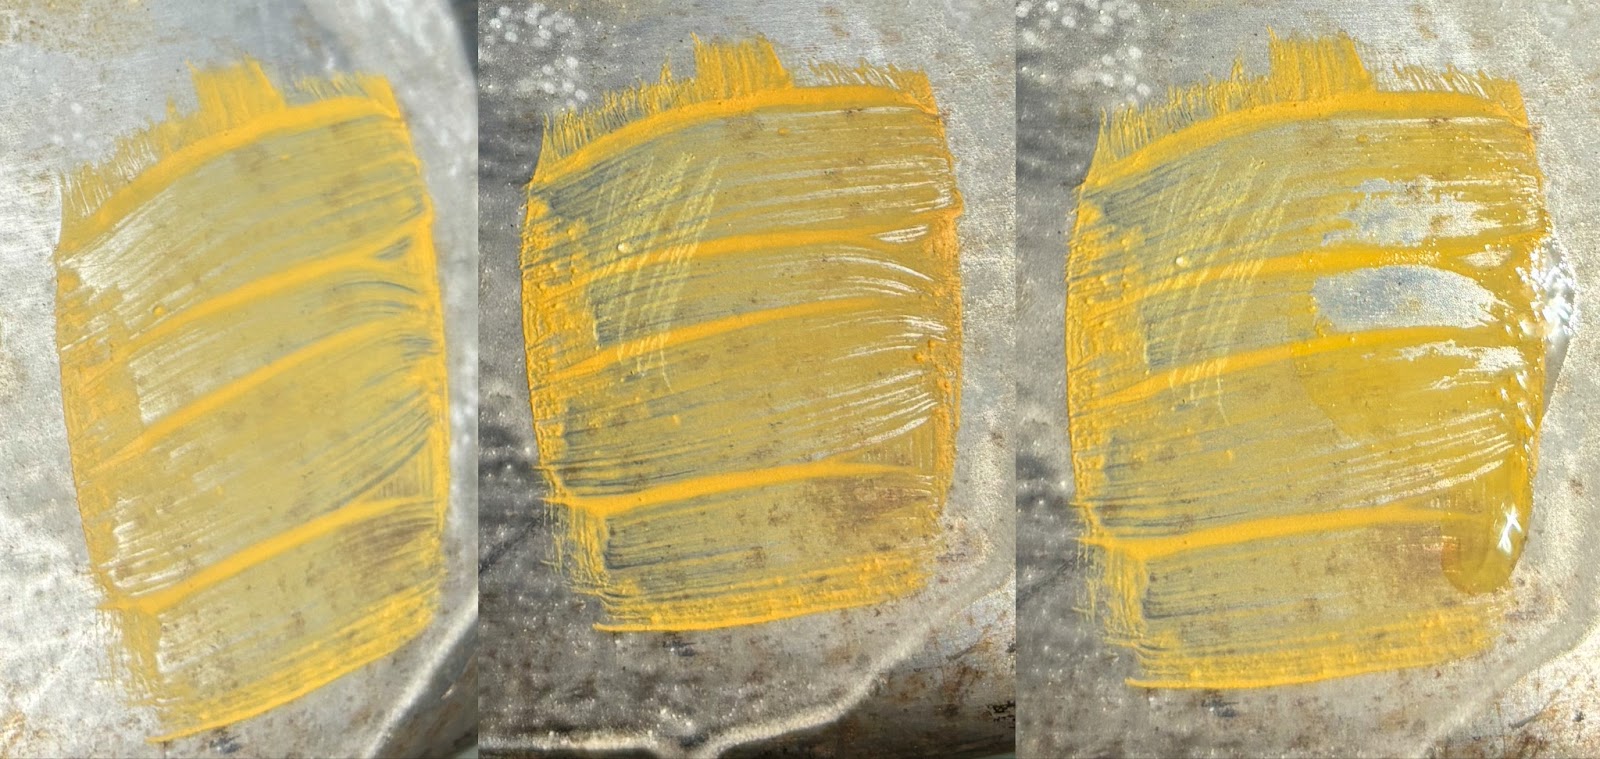
The gesso base only improved its performance slightly. Adherence was about the same, and the scratch did not go all the way through the paint, though some still lifted with the water.
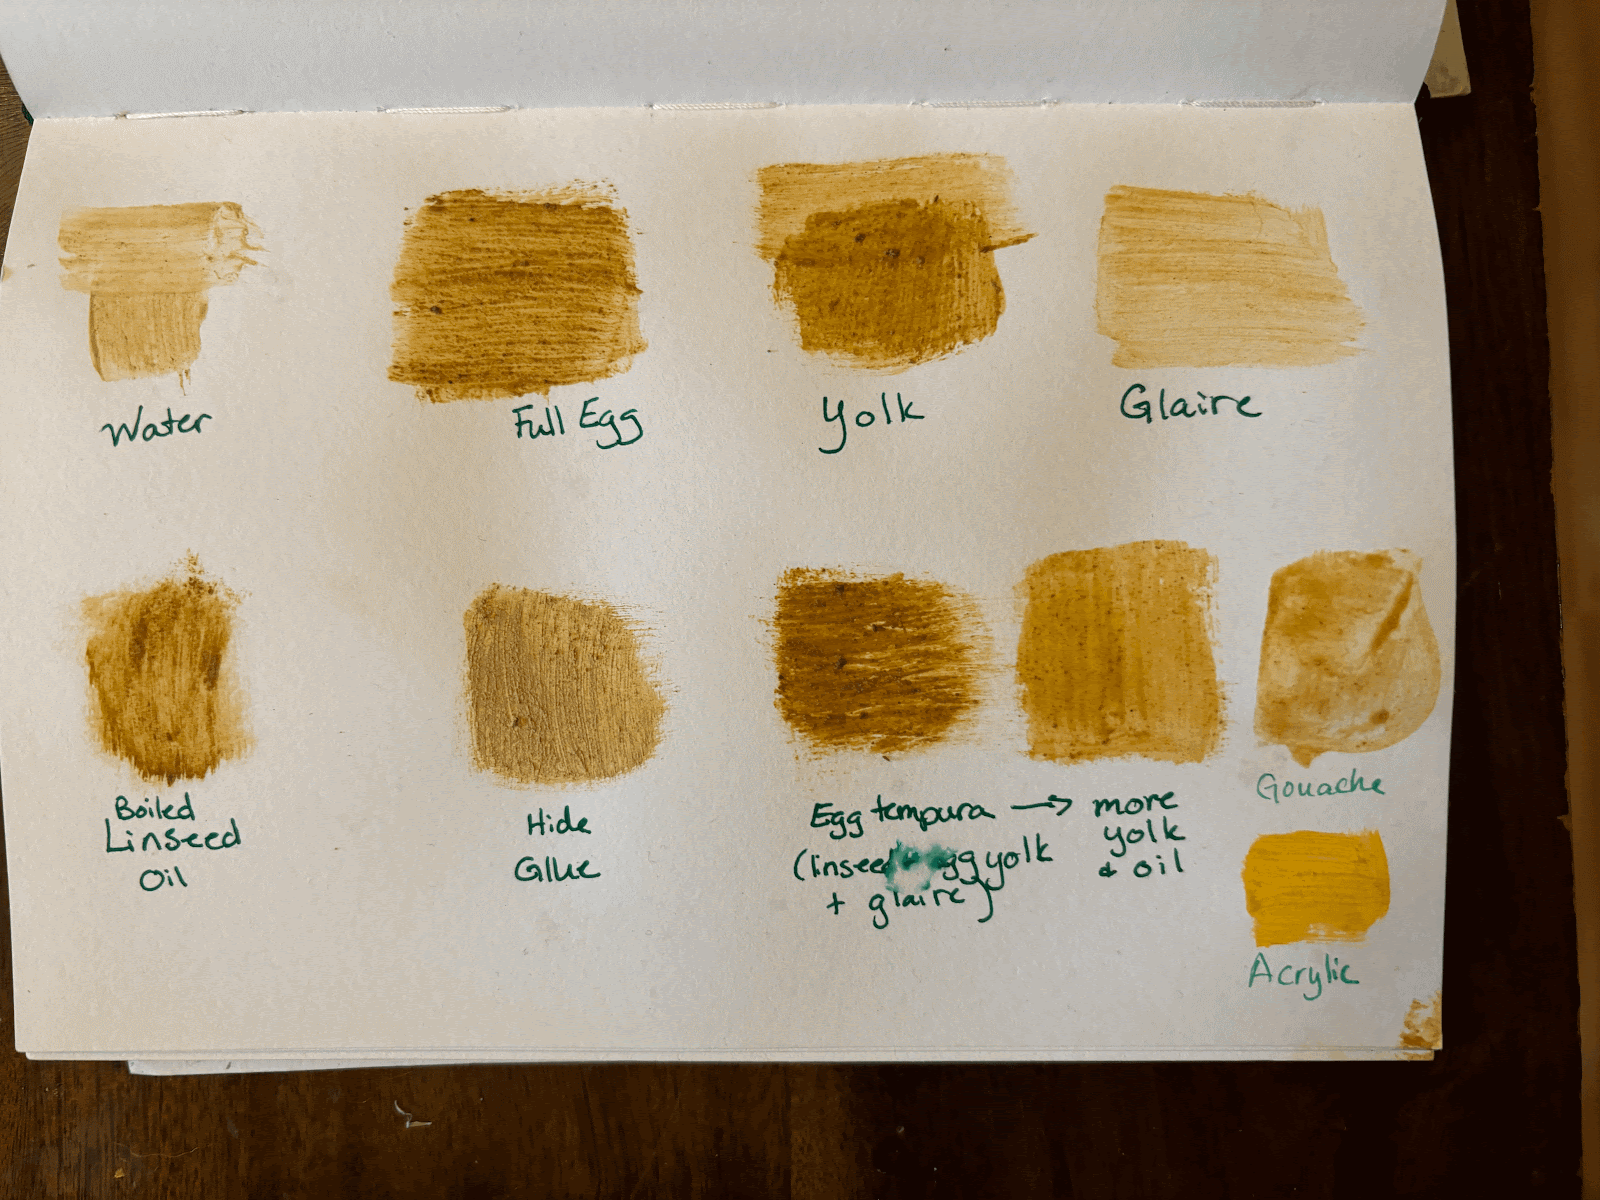
Finally, an overview of all the methods on modern paper. It’s interesting to note that the ones that did the poorest on the metal appear the most appealing on paper. The kettle was hit repeatedly with a rattan sword, and all of the paints maintained enough flexibility to avoid cracking. This aspect is likely to deteriorate with time.
Conclusion:
Different paint making methods are useful for different applications. For a strong, temporary metal armor paint, the gouache over gesso or hide glue over gesso would probably be the method of choice. But for a long lasting paint that will not drip away with rain, sweat, or the blood of enemies, you will probably have a more enduring paint with the egg tempura or the yolk paint over gesso. An additional overlay of egg may further increase the paint’s longevity. Further study topics may include any improvement using more finely ground pigments or non-rock pigments as well as the effects of using well hardened linseed oil or aged glair.
Resources:
Castel d’Avignon, M. OL (AEthelmearc) ( 2006). “An Introduction to Paint Making” Last viewed 6-15-24 from https://www.angelfire.com/pa/allthat2/scriptorium/paint.html
Breiding, D. (2003) “The Decoration of European Armor” Metropolitan Museum of Art. Last viewed 6-15-24 from https://www.metmuseum.org/toah/hd/deca/hd_deca.htm#:~:text=Some%20of%20the%20earliest%20decorated,France%2C%20Germany%2C%20and%20Austria.
von Hefner-Alteneck, J. H. “Medieval Arms and Armor: A Pictorial Archive.” Dover. Last viewed 6-15-24 from https://books.google.com/books?hl=en&lr=&id=dWS8AQAAQBAJ&oi=fnd&pg=PT9&dq=medieval+painted+armor&ots=sT4Mp6Btgz&sig=79UEjd4NXWeQy0rIyyVIG73cRuQ#v=onepage&q=medieval%20painted%20armor&f=false
Sparks, J. C. “Medieval Illumination Recipes” last viewed 6-15-24 from https://www.jcsparks.com/painted/recipes.html#Gesso
Kroustallis, S. (2011) “Binding media in medieval manuscript illumination: a source of research” ResearchGate. Last viewed 6-15-24 from https://www.researchgate.net/profile/Stefanos-Kroustallis/publication/288624580_Binding_media_in_medieval_manuscript_illumination_a_source_of_research/links/5beabe37a6fdcc3a8dd21b18/Binding-media-in-medieval-manuscript-illumination-a-source-of-research.pdf?origin=publication_detail&_tp=eyJjb250ZXh0Ijp7ImZpcnN0UGFnZSI6InB1YmxpY2F0aW9uIiwicGFnZSI6InB1YmxpY2F0aW9uRG93bmxvYWQiLCJwcmV2aW91c1BhZ2UiOiJwdWJsaWNhdGlvbiJ9fQ
Rotschopf (2015) “Medieval paints and pigments for practical application”. Last viewed 6-15-24 from https://wh1350.at/en/tutorials-en-all/11366/
Schadle, K (2021) “History of Egg Tempera Painting” Last visited 6-15-24 from https://www.kooschadler.com/techniques/history-egg-tempera-2022.pdf