As spring is fully displaying it's wonders right now, I'm reminded of this truth often. In every brilliant blossom and nursing newborn and wonder we stumble across...
"Next time a sunrise steals your breath or a meadow of flowers leaves you speechless, remain that way, say nothing and listen as heaven whispers, "Do you like it? I did it just for you." ~Max Lucado
Saturday, April 30, 2016
Thursday, April 21, 2016
Waste Not Fruit Leather
Are you guys getting this crazy heat!? 88 degrees in April just seems surreal! I used to LOVE the sun, and it couldn't get too hot for me, but now I'm afraid Alaska has ruined me. I feel like I'm melting as soon as the mercury hits 80 and I'm more than a little concerned about this upcoming summer! But, oh! The blooms! The variety of plants that are thriving in this climate never ceases to astound me. My neighbor threw some lilac boughs on the burn pile yesterday because she had to thin her tree out a little, but I couldn't bear it! I had to rescue them and brought them all in the house! =)
We've had a lovely week of exploring gardens, wading in creeks, and shooting with friends. Not to mention catching tad poles and filling up the kiddie pool! Our little lady has decided that while we're out and about, her snack of choice is an apple. Not slices, no, the whole thing. And that's all well and good except, she gets it to where it is just beginning to look polka-dotted with her tiny little bite marks and then she decides she's done. Even on her best day, she'll eat off all the skin but doesn't want to eat the flesh. But I'm pretty okay with it because of my latest technique for using what we have.
Last summer we made a lot of smoothies with unfinished bits of fruit, but this spring I've been taking it a different direction. Like I've said before, good fresh fruit was difficult to come by in Fairbanks, so it pains me to see it go to waste! So lately, I've taken the leftover bits and pieces and throwing them into the blender, then in my dehydrator to make fruit leather. This is so easy! I only have one tray right now, so my blender half filled with puree will then fill my dehydrator tray just about perfectly. As. Kadee mentions in her post Oh So Delicioso, the right consistency comes from patience and spreading it so it's just thicker than transparent. In the dehydrator set to 135, this will take about 6 hours to fully dry. But keep checking on it as you get close because different combinations are going to take different lengths. It should feel fairly dry to the touch.
And flavor combinations are endless! Right now, mine usually involve some apple and banana, but I've been adding in melon, orange, and blackberries. I did a couple adding a spoonful of honey or sweetened jam, but it certainly wasn't necessary. I even did one that was about half Greek yogurt! It was really tasty! This is another place to sneak in some well paired vegetables as well, like cucumber, spinach and carrots. I've snuck them all in! =)
So far this spring, I haven't had a batch last more than a day. The young 'uns eat it like candy, it's easy to make and easy to grab on the go! My next batch is going to be blackberry watermelon. What other concoctions could we come up with?
Note: our family shares our own germs, but if you're making this to share outside of immediate family, I recommend using non-nibbled fruit! =)
Wednesday, April 13, 2016
Recovery (Fair Review and New Game: Pong Hau K'i!)
Alright folks, climbing back in the saddle after a wild rodeo of a weekend! But it sure was fun! As I mentioned before, I've been a bit absent of late prepping for GWMC's first craft fair! It was very small, but I made a handful of sales and met some really wonderful people! Thanks to all of you who stopped by or had a hand in the behind-the-scenes work! I can't imagine having done it without you (certainly not without a few more silver hairs to add to my crown ;)
All in all, I felt pretty prepared (thanks to some Pintrest hints). Maybe a little too prepared. I may have diversified excessively, but I think it worked out in the end. I sold everything from skirts and bibs to notecards to fudge! One item that caught all the children's eyes were these little game boards with flat marbles as game pieces. I'll be honest, Josh and I broke them out during some of the slow times, too! But so easy to make and I wanted to share the idea with you!
You can get these tree rounds at a craft store, but they can get a little spendy. Josh just took a branch that had been trimmed from one of our trees and went at it with the chain saw! I was really quite impressed with how narrow he was able to get them! I'll have to remember that for future projects! =) After a light sanding, I did some quick straight lines with a wood burner, but I'm sure you could accomplish the same effect with a permanent marker. Then seal with a layer of matte clear coat!
I'm fairly certain everyone knows how to play tic tac toe, so I'm not including instructions. Though my four year old and his buddy had a pretty interesting version of it that I'm sure they'd love to teach you if given the chance =) But I found this other small board game from China called Pong Hau K'i that I thought was really fun! The idea is that to players each have two pebbles. They take turns placing them one of the intersections or corners. They then continue to take turns moving to the open space with whichever pebble can go there by following a line until one player is unable to move. So you try to trap your opponent onto one side. Video instructions from "What Do We Do All Day." I really enjoyed learning something new and simple to play and I hope you will, too!
All in all, I felt pretty prepared (thanks to some Pintrest hints). Maybe a little too prepared. I may have diversified excessively, but I think it worked out in the end. I sold everything from skirts and bibs to notecards to fudge! One item that caught all the children's eyes were these little game boards with flat marbles as game pieces. I'll be honest, Josh and I broke them out during some of the slow times, too! But so easy to make and I wanted to share the idea with you!
You can get these tree rounds at a craft store, but they can get a little spendy. Josh just took a branch that had been trimmed from one of our trees and went at it with the chain saw! I was really quite impressed with how narrow he was able to get them! I'll have to remember that for future projects! =) After a light sanding, I did some quick straight lines with a wood burner, but I'm sure you could accomplish the same effect with a permanent marker. Then seal with a layer of matte clear coat!
I'm fairly certain everyone knows how to play tic tac toe, so I'm not including instructions. Though my four year old and his buddy had a pretty interesting version of it that I'm sure they'd love to teach you if given the chance =) But I found this other small board game from China called Pong Hau K'i that I thought was really fun! The idea is that to players each have two pebbles. They take turns placing them one of the intersections or corners. They then continue to take turns moving to the open space with whichever pebble can go there by following a line until one player is unable to move. So you try to trap your opponent onto one side. Video instructions from "What Do We Do All Day." I really enjoyed learning something new and simple to play and I hope you will, too!
Tuesday, March 29, 2016
DAISY Chain Craft Fair!
Happy (belated) Easter friends! I'm terribly sorry I've been a bit absent lately, but I've been thinking about catching up every day! There has been a lot of behind-the-scenes type work going on around our house lately, and I'm so excited to share it with you! As I mentioned in my previous post, I'm going to be setting up my first craft fair booth at DAISY Chain's 2nd Annual craft fair in just a couple weeks. Today I want to give you an idea of what I've been working on for my little table!
Bandana Bibs! Little ones can produce an illogical amount of drool, especially while teething, but they can sure look cute at the same time! I love the look of these little bandana style drool bibs and tried to incorporate more absorbent fabrics into these. I have both regular and slouchy (shown) styles.
It was so hard to decide what to focus on, but this is the direction I've decided to take for my first show. I'm a little giddy through all this prep, and I truly hope if you're able to make the trip that I'll see you there! April 9-10 from 12:00 - 4:00 pm at 1244 Lawrence St. in Eugene. Look for my sign (it will hopefully be slightly more embellished by then):
Art Print Cards! From several of my larger pieces, miniaturized, folded, inscribable, and givable.
Baby and Toddler Skirts! My daughter wants to wear a comfortable "dancing skirt" all the time and these are such a joy to make. My fabrics and trimmings are often from my multigenerational stash (thanks Mom!) and vintage, upcycled sources, but always thoroughly cleaned beforehand, of course.
Bandana Bibs! Little ones can produce an illogical amount of drool, especially while teething, but they can sure look cute at the same time! I love the look of these little bandana style drool bibs and tried to incorporate more absorbent fabrics into these. I have both regular and slouchy (shown) styles.
I also have a variety of winter and summer bonnets, candles and magnets. There are also many more styles and designs of each, this is just to give you an idea And who knows what else I might get a hankering to whip out before the big weekend! ;)It was so hard to decide what to focus on, but this is the direction I've decided to take for my first show. I'm a little giddy through all this prep, and I truly hope if you're able to make the trip that I'll see you there! April 9-10 from 12:00 - 4:00 pm at 1244 Lawrence St. in Eugene. Look for my sign (it will hopefully be slightly more embellished by then):
Wednesday, March 9, 2016
Trail Etiquette: Hiking with Children
Some of my happiest memories all through my life have been on a trail of one sort or another and I'm so thrilled to begin to share that with my children. For many trails, there are outright laws that direct behavior while exploring, while there are some courtesies that can be applied to all. Most of them are common sense or perhaps even regional, but I'd like to share my thoughts on trail etiquette, especially with children
1. Be friendly! Greet those you pass! This is how we used to pick out newbies or "city folk" growing up! Haha! (Sorry city folk, I know some of you can be outdoorsy, too! =) Hiking can be hard. Be nice. And don't forget to warn of any dangers (wildlife, path degradation, etc.) ahead. Or go the extra mile and say something encouraging! On one of our last bigger hikes, my son was struck by how encouraged he was on our way up by one man who simply told us how much farther we had to go. So he told every single person we passed on our way down about how far thy had left! This might be excessive for an adult to do, but it's a nice thought!
2. Yielding the path. I know the general rule is just for those going down hill to yield to those going uphill, but with very young hikers, we pretty much step aside for everyone. It's okay to get passed. We all get to where we're going at our own pace.
3. A group only goes as fast as their slowest hiker. Basically, stay together. Of course differing opinions on this, too, but isn't the point of going on a hike together to be together? There's always a little straggling or speeding, but our general rule is to stay where we can all see each other. And I find for us it works well to just let the kids pick the pace. Yes, there's lots of stopping, but that's when I see the most learning happening. It's not all about the destination.
4. Staying on the trail: most public parks employ this rule, but I would say the best excuse to break that would be to relieve oneself. Lets face it, with little ones, potty breaks aren't always predictable and usually quite urgent. Just remember to have them go at least several yards off the trail, 200 feet from water, and to bury anything solid (especially toilet paper!)
5. General public trail respect. Pack your garbage out. Don't vandalize. Don't feed the wildlife nor try to get too close to them. Don't pick the flora, the exception being an emergency. Though I have also picked edible plants that were growing in abundance along the trail itself for grumpy hungry children. But in these cases I follow the forager rules of only picking what you need and leaving more than enough for the continuing of the growth. Interesting article on public land foraging regulations along the Pacific states (and BC) at Wild Harvests.
And here's my rule that I've pretty much tossed out the window: be quiet. Maybe it isn't perfectly courteous, but I have children. They're outside and excited and wild adventurers. They're not going to be quiet. I know people go hiking to get away from the noise, and to them I do apologize. I know it's going to scare off the wild life. But right now, they are the wild life! I can't tell them to use their inside voices. Right now, being quiet outside is only for hunting.
As you've probably already gathered, I can be a bit of a rule breaker at times, and I feel like so many of the "rules" are situational and dependent on the time and the trail. Just some things to think about, though. There are lots of great trail etiquette posts out there like this from Melissa Farage and another from North Cascade Hiker. Happy hiking!
![]() |
| Happy! I will be so goofy for that grin! Hiking at Chatanika, AK |
1. Be friendly! Greet those you pass! This is how we used to pick out newbies or "city folk" growing up! Haha! (Sorry city folk, I know some of you can be outdoorsy, too! =) Hiking can be hard. Be nice. And don't forget to warn of any dangers (wildlife, path degradation, etc.) ahead. Or go the extra mile and say something encouraging! On one of our last bigger hikes, my son was struck by how encouraged he was on our way up by one man who simply told us how much farther we had to go. So he told every single person we passed on our way down about how far thy had left! This might be excessive for an adult to do, but it's a nice thought!
![]() |
| I believe this was Fynn's first serious hike (3 mo. 6 miles to Kennecott Mines, AK) Doesn't he look happy!? =) |
2. Yielding the path. I know the general rule is just for those going down hill to yield to those going uphill, but with very young hikers, we pretty much step aside for everyone. It's okay to get passed. We all get to where we're going at our own pace.
![]() |
| Nov 2015, McKenzie River, OR |
3. A group only goes as fast as their slowest hiker. Basically, stay together. Of course differing opinions on this, too, but isn't the point of going on a hike together to be together? There's always a little straggling or speeding, but our general rule is to stay where we can all see each other. And I find for us it works well to just let the kids pick the pace. Yes, there's lots of stopping, but that's when I see the most learning happening. It's not all about the destination.
![]() |
| Studying a snail. Sweet Creek Falls, 2015 |
![]() |
| Kauai 2013 |
5. General public trail respect. Pack your garbage out. Don't vandalize. Don't feed the wildlife nor try to get too close to them. Don't pick the flora, the exception being an emergency. Though I have also picked edible plants that were growing in abundance along the trail itself for grumpy hungry children. But in these cases I follow the forager rules of only picking what you need and leaving more than enough for the continuing of the growth. Interesting article on public land foraging regulations along the Pacific states (and BC) at Wild Harvests.
![]() |
| Valdez, AK 2011 |
And here's my rule that I've pretty much tossed out the window: be quiet. Maybe it isn't perfectly courteous, but I have children. They're outside and excited and wild adventurers. They're not going to be quiet. I know people go hiking to get away from the noise, and to them I do apologize. I know it's going to scare off the wild life. But right now, they are the wild life! I can't tell them to use their inside voices. Right now, being quiet outside is only for hunting.
![]() |
| Darlingtonia Wayside with my parents, 2015 |
As you've probably already gathered, I can be a bit of a rule breaker at times, and I feel like so many of the "rules" are situational and dependent on the time and the trail. Just some things to think about, though. There are lots of great trail etiquette posts out there like this from Melissa Farage and another from North Cascade Hiker. Happy hiking!
![]() |
| Silver Falls, 2015 |
Wednesday, March 2, 2016
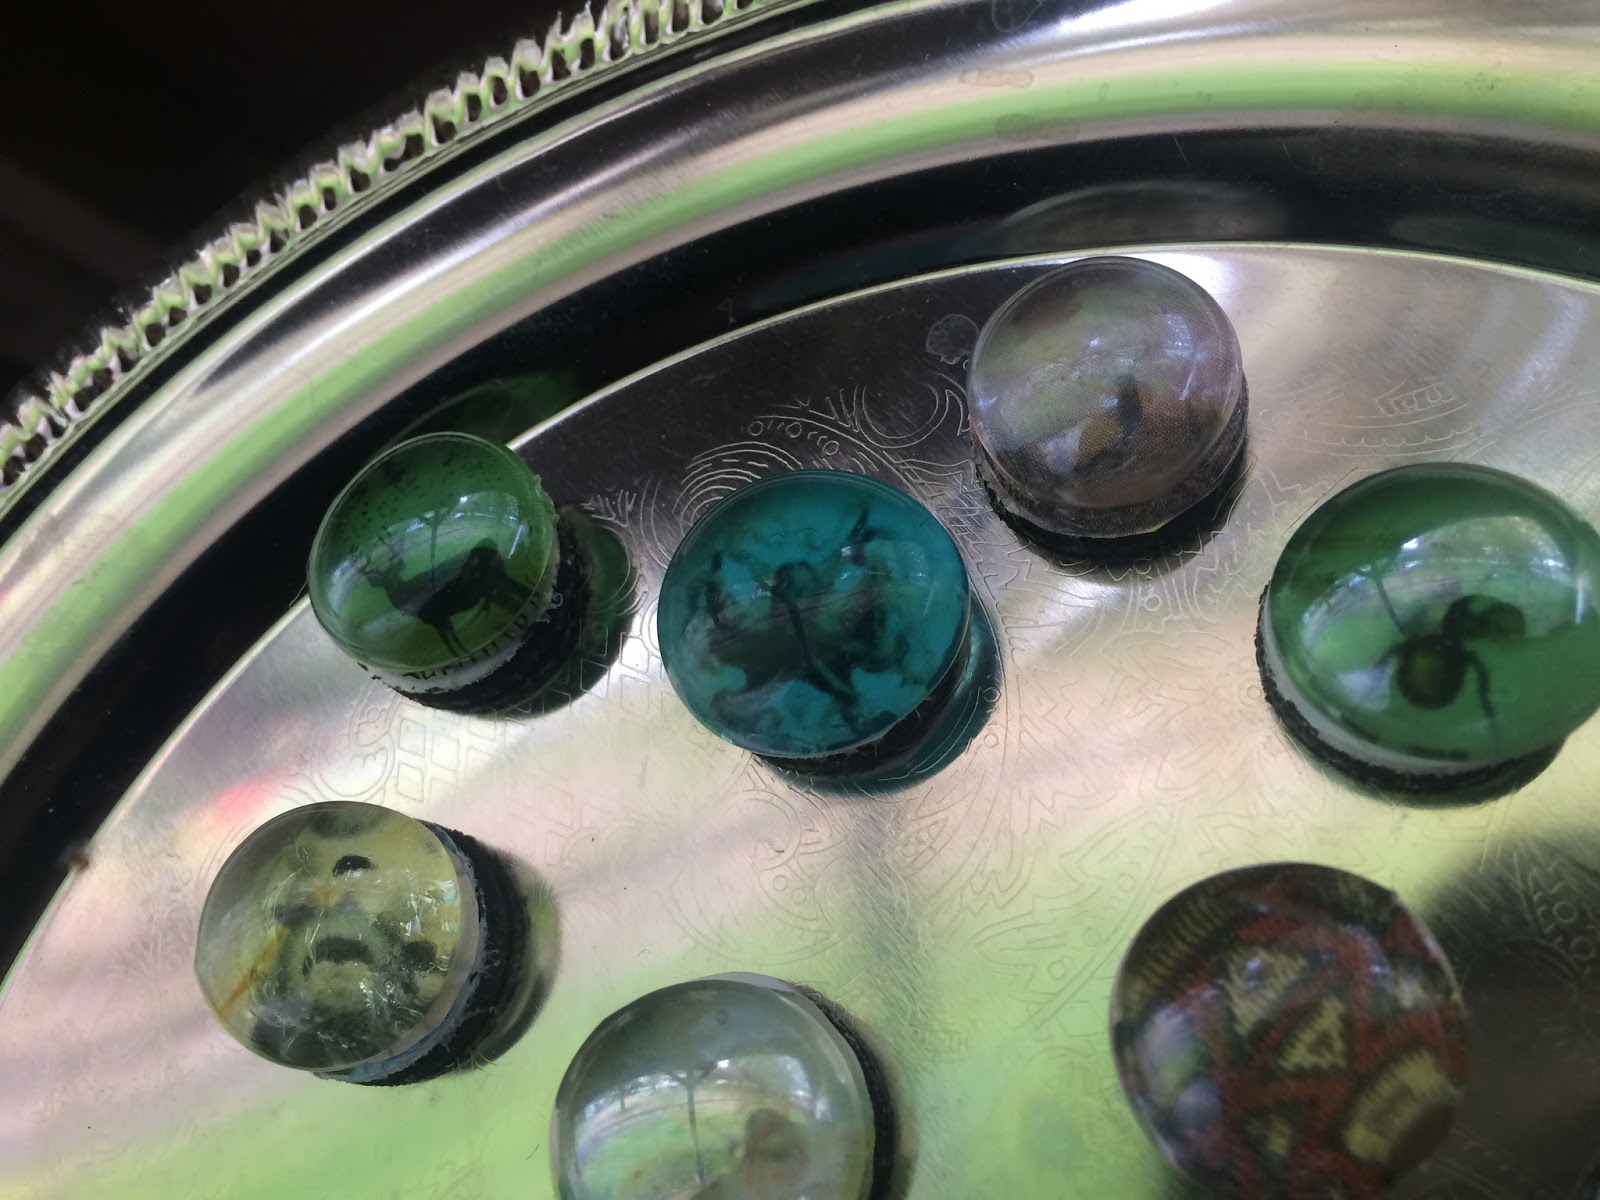
Miniature Magnifying Magnets (Plus a Potential Plot)
What a blustery day it has been! Our huge dog (who regularly drags logs around the yard and helps me haul firewood) thought it was a great game that the trees were raining giant branches down on him! Like they were bestowing on him gifts of new toys! Ah, he can be troublesome, but he sure brings a smile from time to time.
But the shenanigans didn't stop there. Though we went and played outside a couple times through the day, the little ones seemed to have a little extra mischief also. Like taking a break in their recently discovered "bumk beds" (aka bookshelf) and playing in my blanket chest. Well, one did while the other promptly shut the lid and sat on top!
To get to my plans coming up, I'm very excited to have just registered for my very first craft fair! I haven't even been officially accepted yet, but it's had my head spinning with new creations that need my immediate attention. My table is currently covered in cuts of cloth and curiosities (ooh, five alliteration points!) even though the date is more than a month off. I've always loved craft fairs and the unique creations and styles one can find there, and I've toyed with the idea of renting booth space for years, so I'm just giddy about it actually happening now!
I have yet to figure out my niche (see 2 posts ago), but today my oldest and I worked on a fun project that I believe we'll display on our table. These Miniature Magnets are quite simple, yet functional and fascinating.
You'll need:
~small round magnets
~flattened glass marbles (Dollar store!)
~tiny pictures
~hot glue gun and glue sticks
I believe the biggest challenge was finding images small enough. Even when you shrink images on the computer they become very pixilated in the process. Magazines worked well. No two are alike! Test what your image will look like by placing the marble over it. The shape of the marble works to magnify the picture.
The top of the magnets have a sticky side with a sticker backing. When you remove the backing, place it over your image to trace the diameter of the correct size around your picture. Cut out and place on sticky side of the magnet. Then place a pea sized dollop of hot glue on the flat side of your marble and quickly press firmly onto the top of your image. Any bubbles in the glue will be pushed out to the sides.
I love how these turned out! Pretty fun to make, too! I'm curious, have any of you done a craft fair? I'm just hungry for any tips and pointers! Prepare yourselves for lots more crafty posts in the next month! =)
But the shenanigans didn't stop there. Though we went and played outside a couple times through the day, the little ones seemed to have a little extra mischief also. Like taking a break in their recently discovered "bumk beds" (aka bookshelf) and playing in my blanket chest. Well, one did while the other promptly shut the lid and sat on top!
To get to my plans coming up, I'm very excited to have just registered for my very first craft fair! I haven't even been officially accepted yet, but it's had my head spinning with new creations that need my immediate attention. My table is currently covered in cuts of cloth and curiosities (ooh, five alliteration points!) even though the date is more than a month off. I've always loved craft fairs and the unique creations and styles one can find there, and I've toyed with the idea of renting booth space for years, so I'm just giddy about it actually happening now!
I have yet to figure out my niche (see 2 posts ago), but today my oldest and I worked on a fun project that I believe we'll display on our table. These Miniature Magnets are quite simple, yet functional and fascinating.
You'll need:
~small round magnets
~flattened glass marbles (Dollar store!)
~tiny pictures
~hot glue gun and glue sticks
I believe the biggest challenge was finding images small enough. Even when you shrink images on the computer they become very pixilated in the process. Magazines worked well. No two are alike! Test what your image will look like by placing the marble over it. The shape of the marble works to magnify the picture.
The top of the magnets have a sticky side with a sticker backing. When you remove the backing, place it over your image to trace the diameter of the correct size around your picture. Cut out and place on sticky side of the magnet. Then place a pea sized dollop of hot glue on the flat side of your marble and quickly press firmly onto the top of your image. Any bubbles in the glue will be pushed out to the sides.
I love how these turned out! Pretty fun to make, too! I'm curious, have any of you done a craft fair? I'm just hungry for any tips and pointers! Prepare yourselves for lots more crafty posts in the next month! =)
Wednesday, February 24, 2016
Beginning the Gardening Adventures (2016)
![]() |
| Daffodils blossom at the base of a fallen snag. |
![]() |
| Spring Queen |
And things are blooming! Daffodils and crocuses of course, but also camellias, violets, nettles, mock cherries, and several new to me as well! So I began to think, "well, maybe I should be growing things now, too?" And, though slightly early, when I looked at a planting chart for the area (great zoning and scheduling for US here) it could already be time to plant some of the seeds I had OUTSIDE! I love it! And I love how we can get hints about the timing of planting based on the wild things growing around us!
So my trusty helpers and I got everything together and got those seeds in some rich dark dirt. Mostly according to the directions, but when your over-eager assistants are 2 and 4, the depth and spacing measurements are kinda out the window. We'll see how things go! This is my first year really trying a container garden, too! My hope is that we'll be moving to our own plot of land by the end of harvest. It may be a long stretch, but I can dream, right? =)
![]() |
| It's good to coat my hands in earth again! |
With a few holes hammered into the lids and filled with water, they made perfect watering cans for the little ones: a manageable size that only released a drizzle instead of a deluge of water at once! Now we wait! I can't wait to be growing our own food again!
Any hints for a new Oregon gardener wannabe? Every thing seems so simple here as a whole! I'm comparing this to my Fairbanks garden where I had to dig several feet through peat moss to the permafrost, build a frame for my garden and line the bottom with 2" insulation, fill with dirt and surround with a fence to keep the arctic hares out all while fighting the swarms of mosquitos. Then every year our neighborhood moose and her calf(s) would eat the majority before I could harvest it! SO infuriating! I've been told the deer are an issue here, and I remember the slugs; is there anything else I should be aware of? I look forward to hearing your gardening adventures!
Subscribe to:
Posts (Atom)